
This is Part 3 of the series “Merry Microservices”
We’ll be building on the confidential note service from Part 1 and the UI gateway from Part 2 but we’ll further our authorization, beyond what OAuth 2.0 provides, by calling a “policy service” where application-specific permissions are managed.
The source can be found on github at https://github.com/sdoxsee/merry-microservices/tree/part3.


Table of Contents
Screencast
Preamble
In order to keep this introduction short, I recommend you first read “Stop overloading JWTs with permission claims” as it provides the rationale for going this route for authorization.
But here’s a quick summary:
We want to keep role and permission claims out of our JWT OAuth 2.0 access token because it should only be concerned with “identity authorization”. However, “identity authorization” isn’t enough because it’s only what the user has authorized the application to do on their behalf–not what the application authorizes the user to do! For that, we need more granular authorization and permissions in our application. Or, to avoid building the same services over and over, we’ll use a centralized “policy service” that we call from our applications that answers whether or not a user has a given permission.
So, what “policy service” are we going to use? Well, there’s the community version of PolicyServer for .NET but that won’t work with anything other than Microsoft. The commercial version could serve our purposes but it
- doesn’t have a freemium model (other than the single application community version)
- doesn’t have a SaaS experience (only docker or self-hosted after paying)
- doesn’t advertise any public documentation
- complicates policies by letting them be hierarchical
As a result, I built my own with JHipster that I hope to make a hosted SaaS soon and/or open source. We’ll be interacting with that for the duration of this post.
Let’s dive right in.
Customizing our note service for more fine-grained authorization
Off the top of my head, we have a few approaches to authorization in Spring Security:
- Route-based authorization (like
ResourceServerConfigbelow) - Method-based authorization (including Spring Security’s
@PreAuthorizecalls) - Imperative authorization where, based on business logic, we throw
AccessDeniedException(that triggers a 403 response) or return a 403 response directly.
I think usually you’d use #1 (route-based) for OAuth 2.0 scope authorization. I’m not a big fan of #2’s (method-based) @PreAuthorize because I find it SPEL awkward and limiting. #3 can be very expressive and testable allowing us to use policyService responses to control access and/or filter results.
Previously we only let Spring Security filters determine if we should return a “401 Unauthorized” or not simply by validating the JWT access token. Perhaps we should have also added route-based configuration to enforce scope authorization by ensuring that a scope like authority-note came with the access token or resulted in a “403 Forbidden” response. Although we’re not going to do that in this tutorial, here’s what it would have looked like:
@EnableWebSecurity
public class ResourceServerConfig extends WebSecurityConfigurerAdapter {

  // @formatter:off
  @Override
  protected void configure(HttpSecurity http) throws Exception {
    http
      .authorizeRequests(authorizeRequests ->
        authorizeRequests
          .mvcMatchers("/**").access("hasAuthority('SCOPE_authority-note')")
          .anyRequest().authenticated())
      .oauth2ResourceServer(oauth2ResourceServer ->
        oauth2ResourceServer
          .jwt());
  }
Instead, let’s go a bit futher by introducing a PolicyService client bean that will query our “policy service” application for more specific permissions in whatever way we decide to use it (be that route-based, method-based or imperatively).
@Service
class PolicyService {

  @Value("${app.policy-name}")
  private String appPolicyName;

  private final WebClient webClient;

  public PolicyService(WebClient webClient) {
    this.webClient = webClient;
  }

  @Transactional(readOnly = true)
  public Mono<Boolean> hasPermission(Jwt jwt, String permission) {
    return this.webClient
        .get()
        .uri(uriBuilder -> uriBuilder
              .path("/api/policy-evaluation")
              .queryParam("policy", appPolicyName)
              .queryParam("permission", permission)
              .build())
        .headers(headers -> headers.setBearerAuth(jwt.getTokenValue()))
        .retrieve()
        .bodyToMono(Boolean.class);
  }
}
In the PolicyService class, we
- inject the
appPolicyNamefrom our properties. This is the handle/application/policy by which we namespace the roles and permissions to the policy we are configuring. Since we’re creting this bean specifically for the note service application, we setapp.policy-name: notein ourapplication.ymlso that all policyService calls will be properly namespaced automatically. - inject our webClient that is configured to talk to the “policy service” application
- implement a
hasPermissionmethod that takes the JWT from the request and verifies whether or not that user has the given permission. We make the call to the “policy service” by relaying the JWT as a header.
Before we use our PolicyService, we must first create a WebClient bean to point to our “policy service” running on port 8080 so that we can inject it into our PolicyService.
  @Bean
  WebClient policyServiceWebClient() {
    return WebClient.create("http://localhost:8080/");
  }
Now we can modify our NoteHandler to use our PolicyService. For this post, we’ll just zero in on the all method that returns a Flux of Note objects in a Mono<ServerResponse>. After we inject our PolicyService, our all method looks something like this:
  Mono<ServerResponse> all(ServerRequest r) {
    return r.principal().flatMap((principal) -> {
      Jwt jwt = ((JwtAuthenticationToken) principal).getToken();
      return policyService.hasPermission(jwt, "CanRead")
          .flatMap(canRead -> canRead ?
            policyService.hasPermission(jwt, "CanReadConfidentialNotes")
              .flatMap(canReadConfidentialNotes -> defaultReadResponse(
                  canReadConfidentialNotes ?
                      noteRepository.findAll() :
                      noteRepository.findByConfidentialFalse()
                  )
              ) :
            ServerResponse.status(HttpStatus.FORBIDDEN).build());
    });
  }
By the way, I’m pretty new at coding with Project Reactor so pardon my style and please leave a comment with any suggestions or improvements! For reference, the equivalent non-reactive code would look something like this:
List<Note> getNotes(Jwt accessToken) {
  // for access
  if (!policyService.hasPermission("note", jwt, "CanRead")) {
    throw new AccessDeniedException(); // 403
  }

  // for filtering
  if (policyService.hasPermission("note", jwt, "CanReadConfidentialNotes")) {
    return noteRepository.findAll();
  } else {
    return noteRepository.findByConfidentialFalse();
  }
}
In any case, we now have a PolicyService client and we’re using it imperatively in the all method of our NoteHandler to provide both
- access control (based on the
CanReadpermission) and - filtered results (based on the
CanReadConfidentialNotespermission)
Note: To be clear, the default response from hasPermission calls to the “policy service” is false so that if a permission isn’t setup, we don’t get unexpected results in our applications!
Setting up the “policy service”
Start Keycloak and “policy service”
Before we can setup the “policy service”, we need to start it up along with Keycloak. We’ve added a new policyservice service to the docker-compose.yml to make it easy to start.
docker-compose up
Log in to “policy service”
If we go to http://localhost:8080 (where it should be running), we can login with username admin and password admin. The admin user is the only user in the default JHipster realm configuration for Keycloak has been given the identity role of ROLE_ADMIN (in addition to ROLE_USER) that our JHipster “policy service” needs to manage entities.
Setup our a note policy for our existing note service
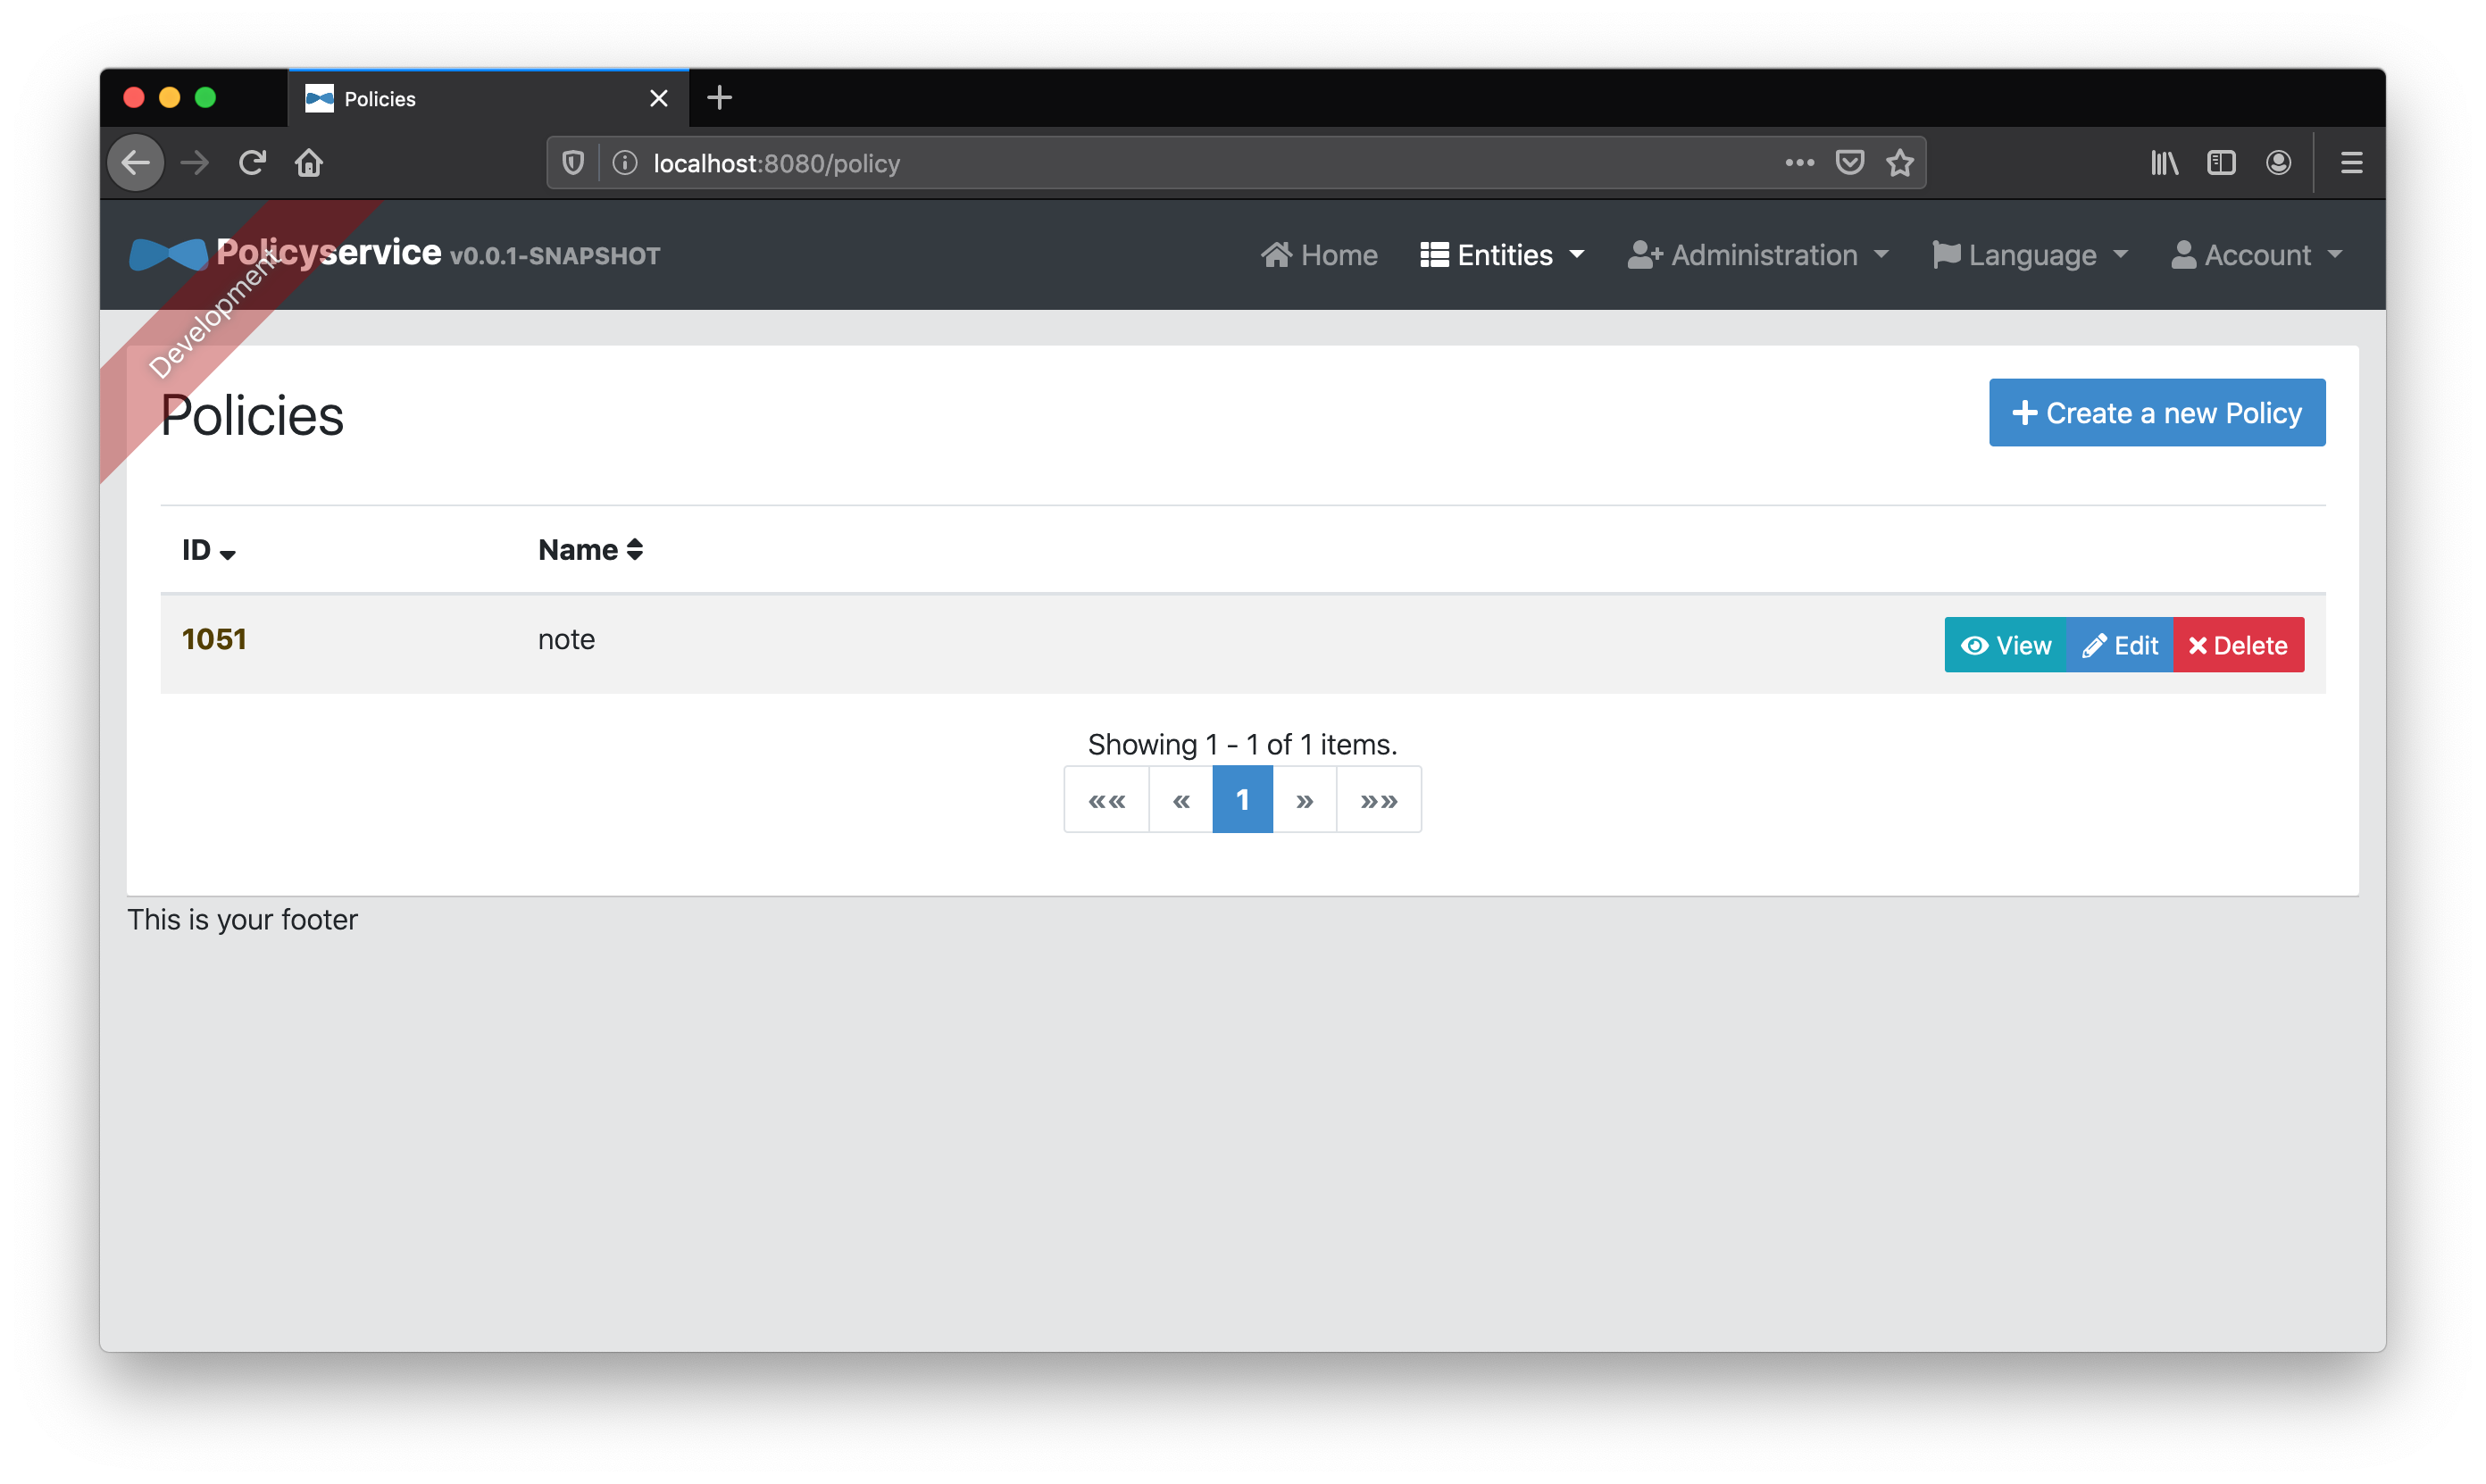
Once we’re authenticated, we need to add a note “Policy” entity that creates a namespace in which we can add “Role” and “Permission” entities for our note service.
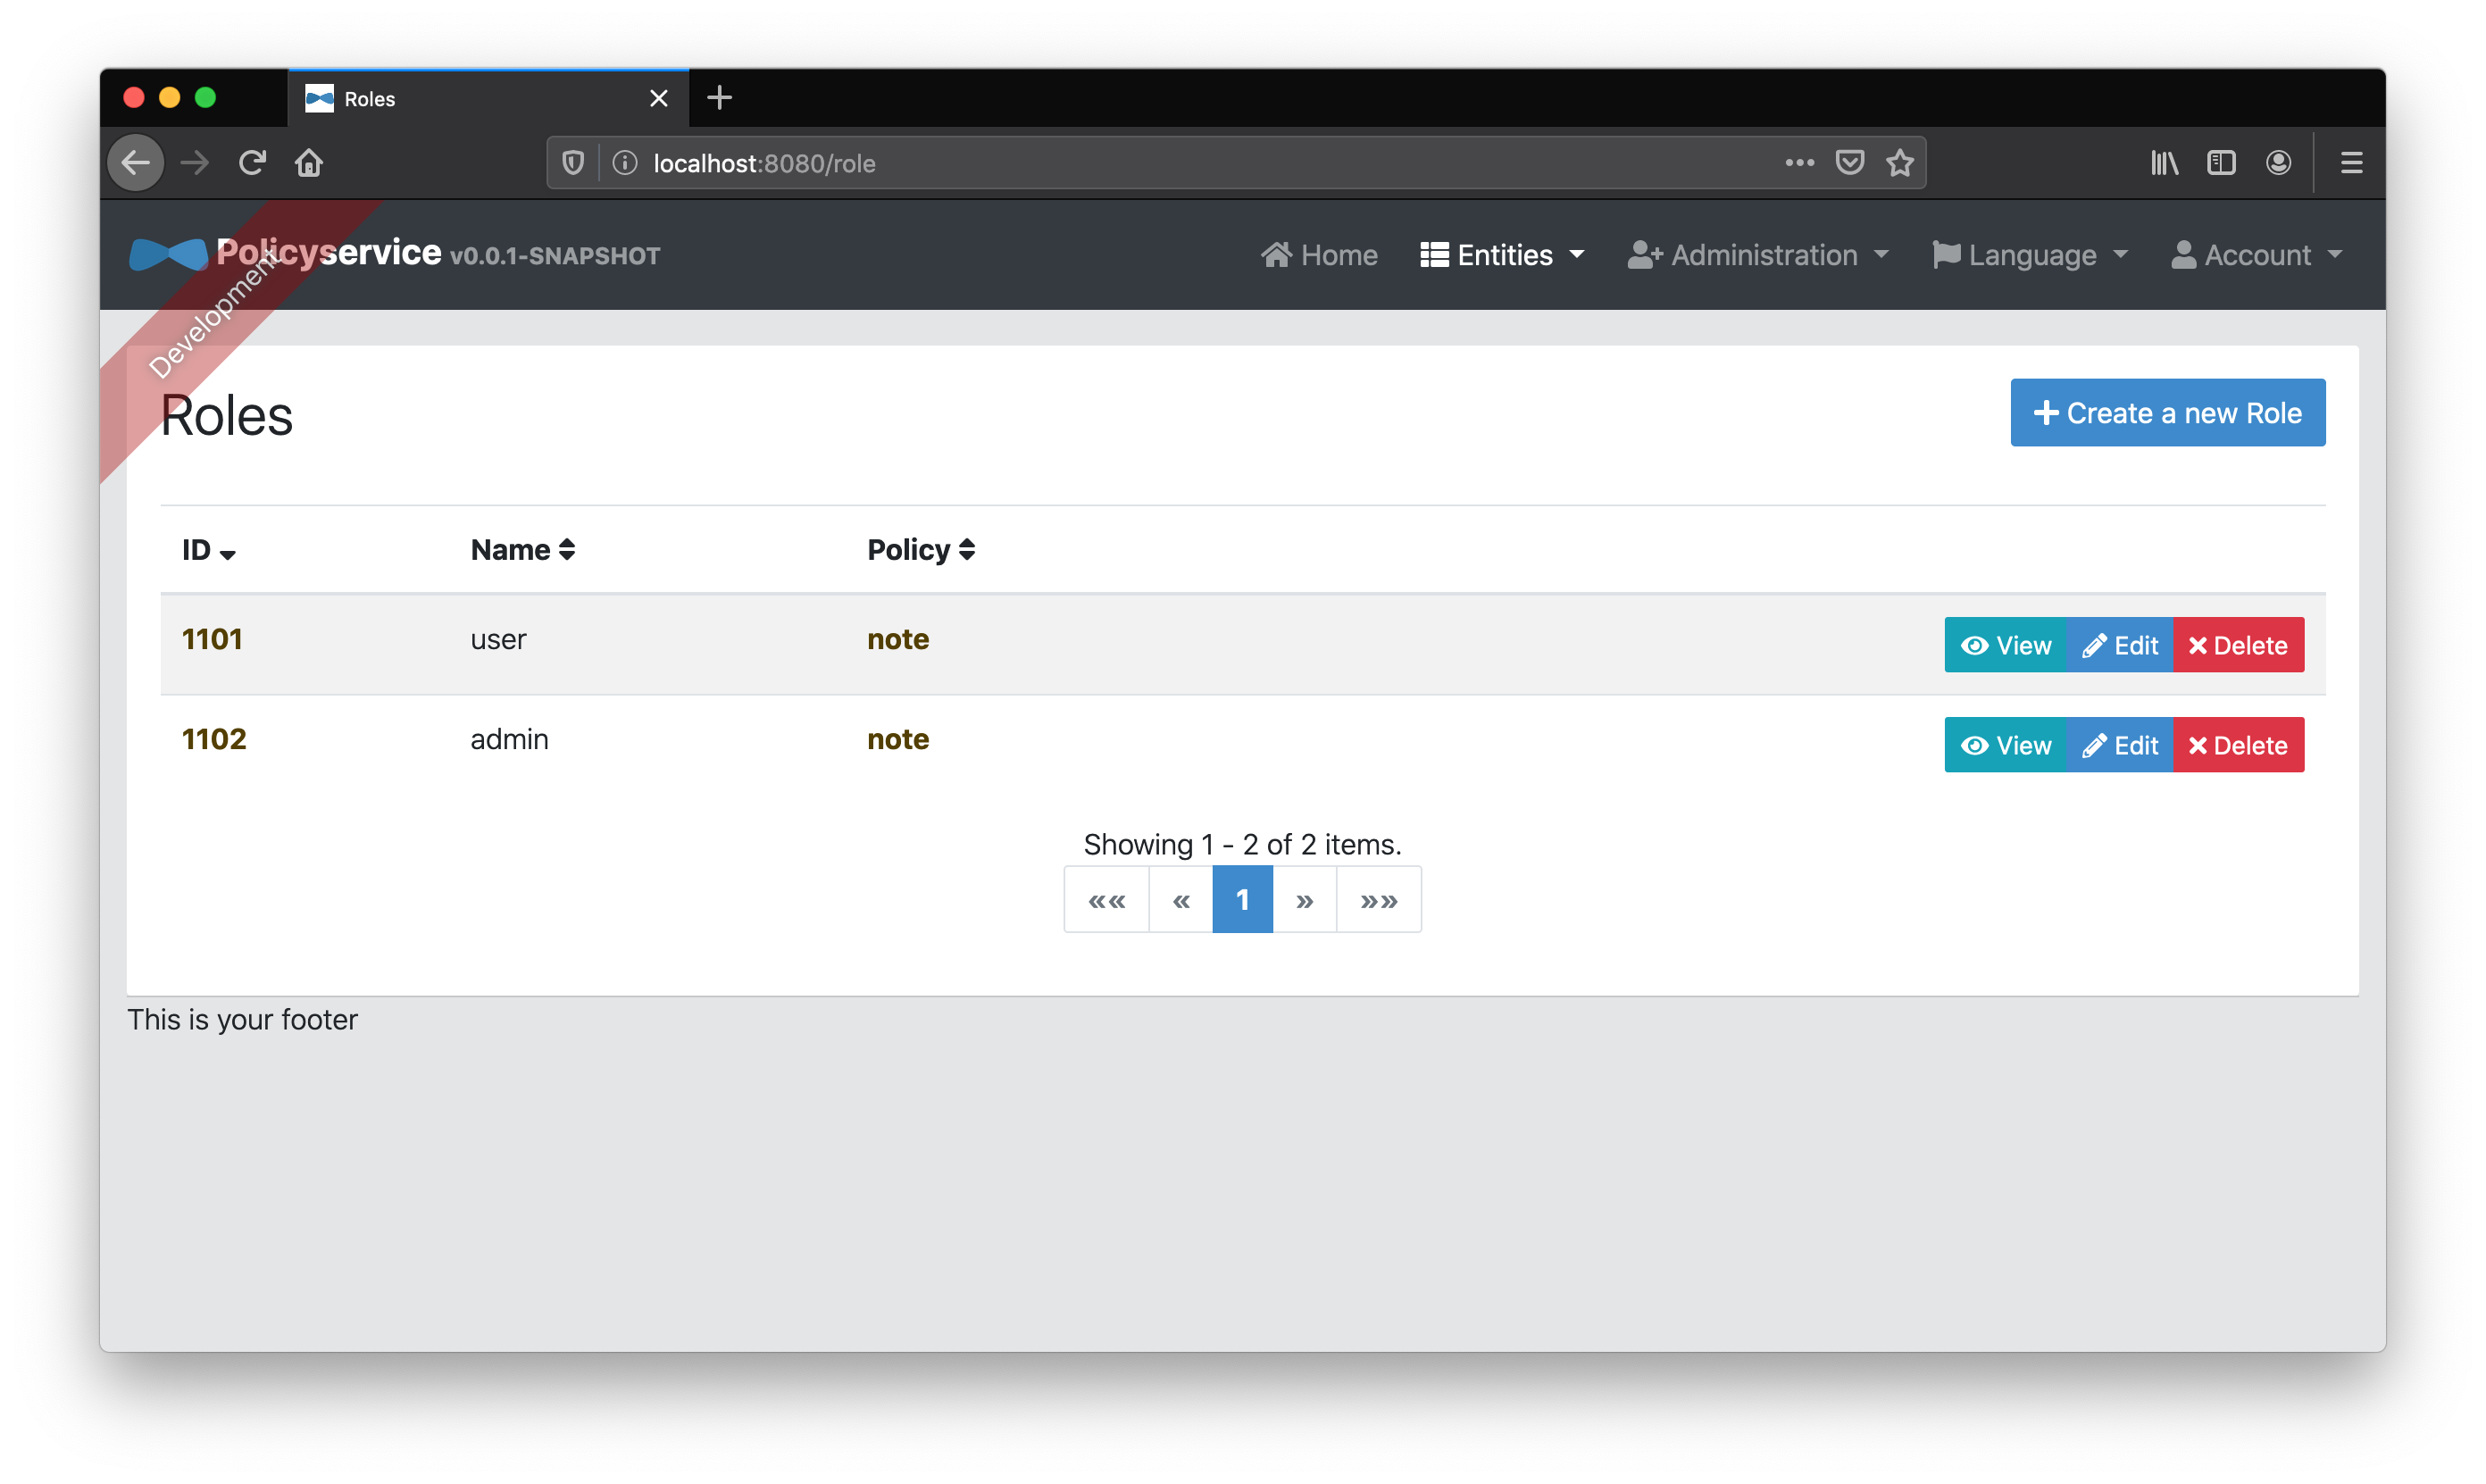
Next we’ll add two “Role” entities to our note “Policy”–user and admin
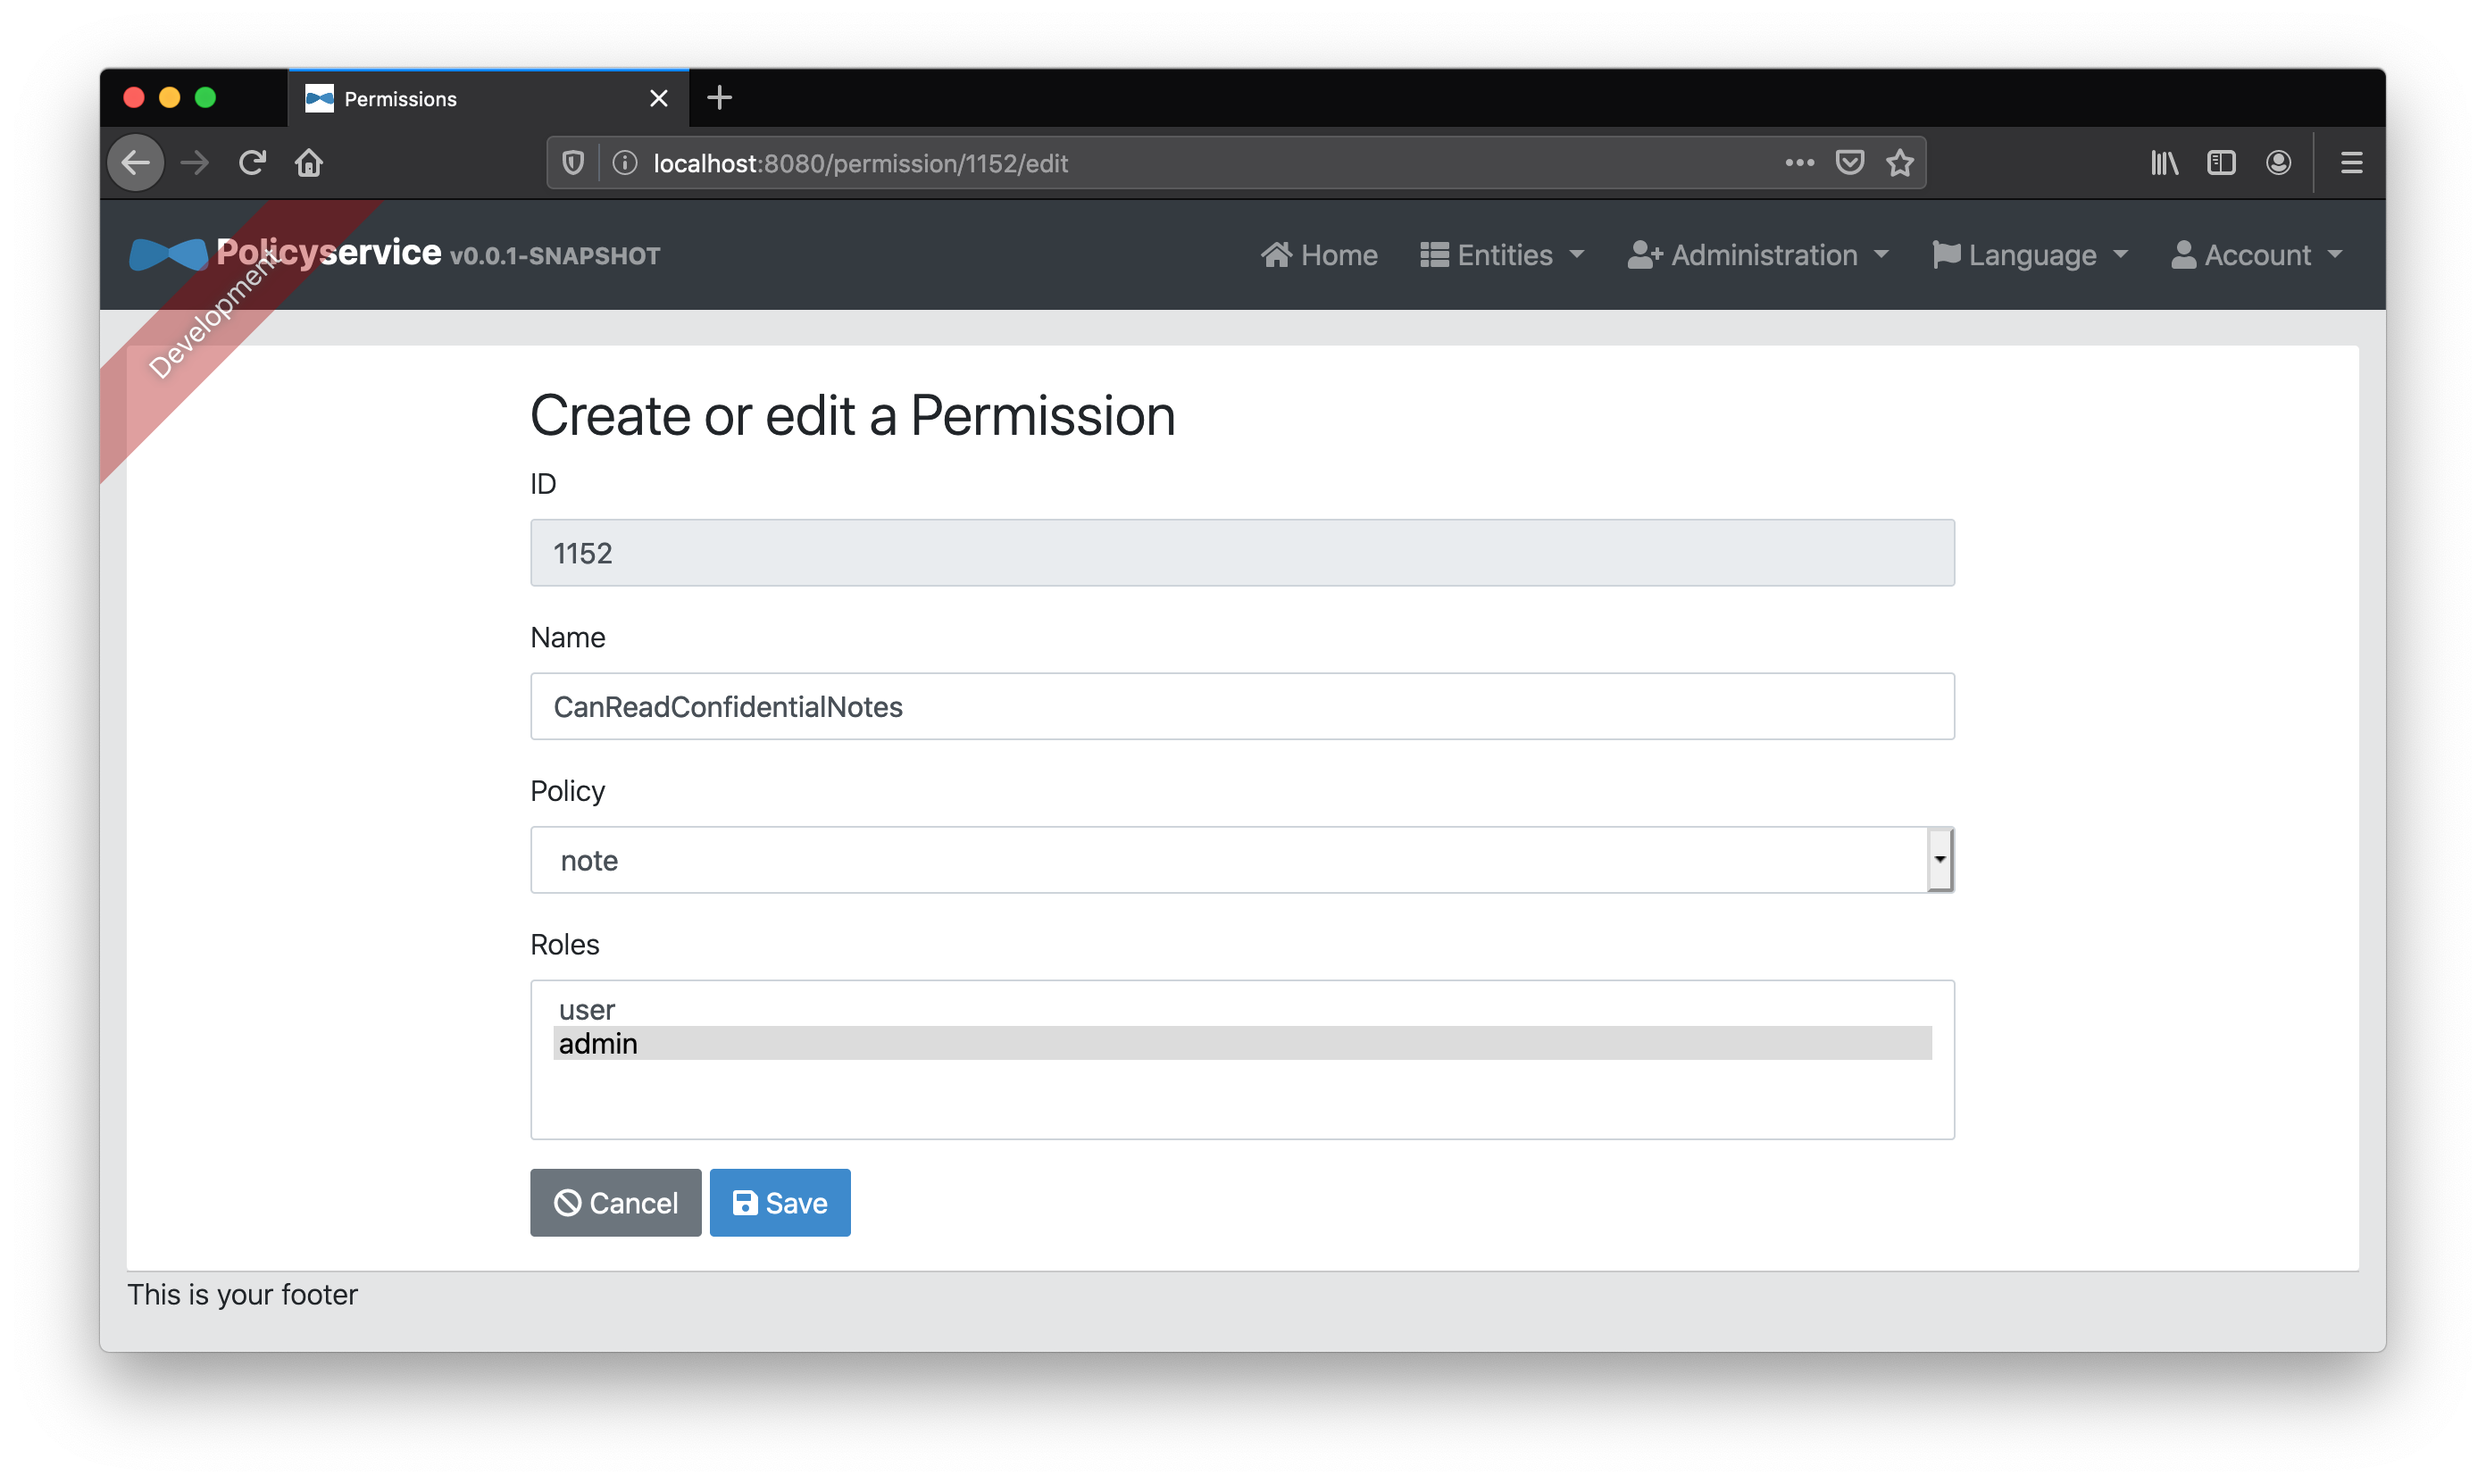
We’ll then add two “Permission” entities, CanRead and CanReadConfidentialNotes, and associate them to the user and admin respectively.

Finally, because we’re lazy and don’t want to get into the batch provisioning of specific user roles and permissions, we’ll create two “Identity Role” entities, ROLE_USER and ROLE_ADMIN, and map them to the “Role” entities user and admin respectively. These identity roles will match those coming from Keycloak’s JWT access token and allow us to map default “Role” entities to any user with those identity roles.

For example, since Keycloak’s admin user has the identity roles ROLE_ADMIN and ROLE_USER in its JWT access token, our “policy service” can automatically map the permissions from the respective admin and user “Role” entities as defined on our policy service. Since Keycloak’s user user only has the ROLE_USER identity role, our “policy service” will only map the roles and permissions that come from the user “Role” entity.
Policy setup for our UI gateway
Note: Before we go any further, we need to make a small tweak to note and gateway. These applications haven’t been running in Docker containers so they could reach the exposed Keycloak Docker container (named keycloak) at http://localhost:9080. Since, to a Docker container, localhost means “the same container”, our “policy service” that is running in a Docker container, isn’t able to reach keycloak at http://localhost:9080 like the other applications were. So, policyservice needs to reach Keycloak via its service name keycloak. But, our “policy service” needs to be able to reach Keycloak not only via backchannel (server to server), it must also be able to it frontchannel (in the browser). Changing the issuer of our “policy service” to reference keycloak breaks the browser redirection because, unless you add it to your machine’s hosts file, it’s unrecognized. So, we make keycloak recognizable. We also need to change application.yml for both gateway and note to use keycloak instead of localhost so we change the value for spring.security.oauth2.client.provider.keycloak.issuer-uri accordingly. If you don’t, the issuer in the JWT will be considered invalid and you’ll get “401 unauthorized”.
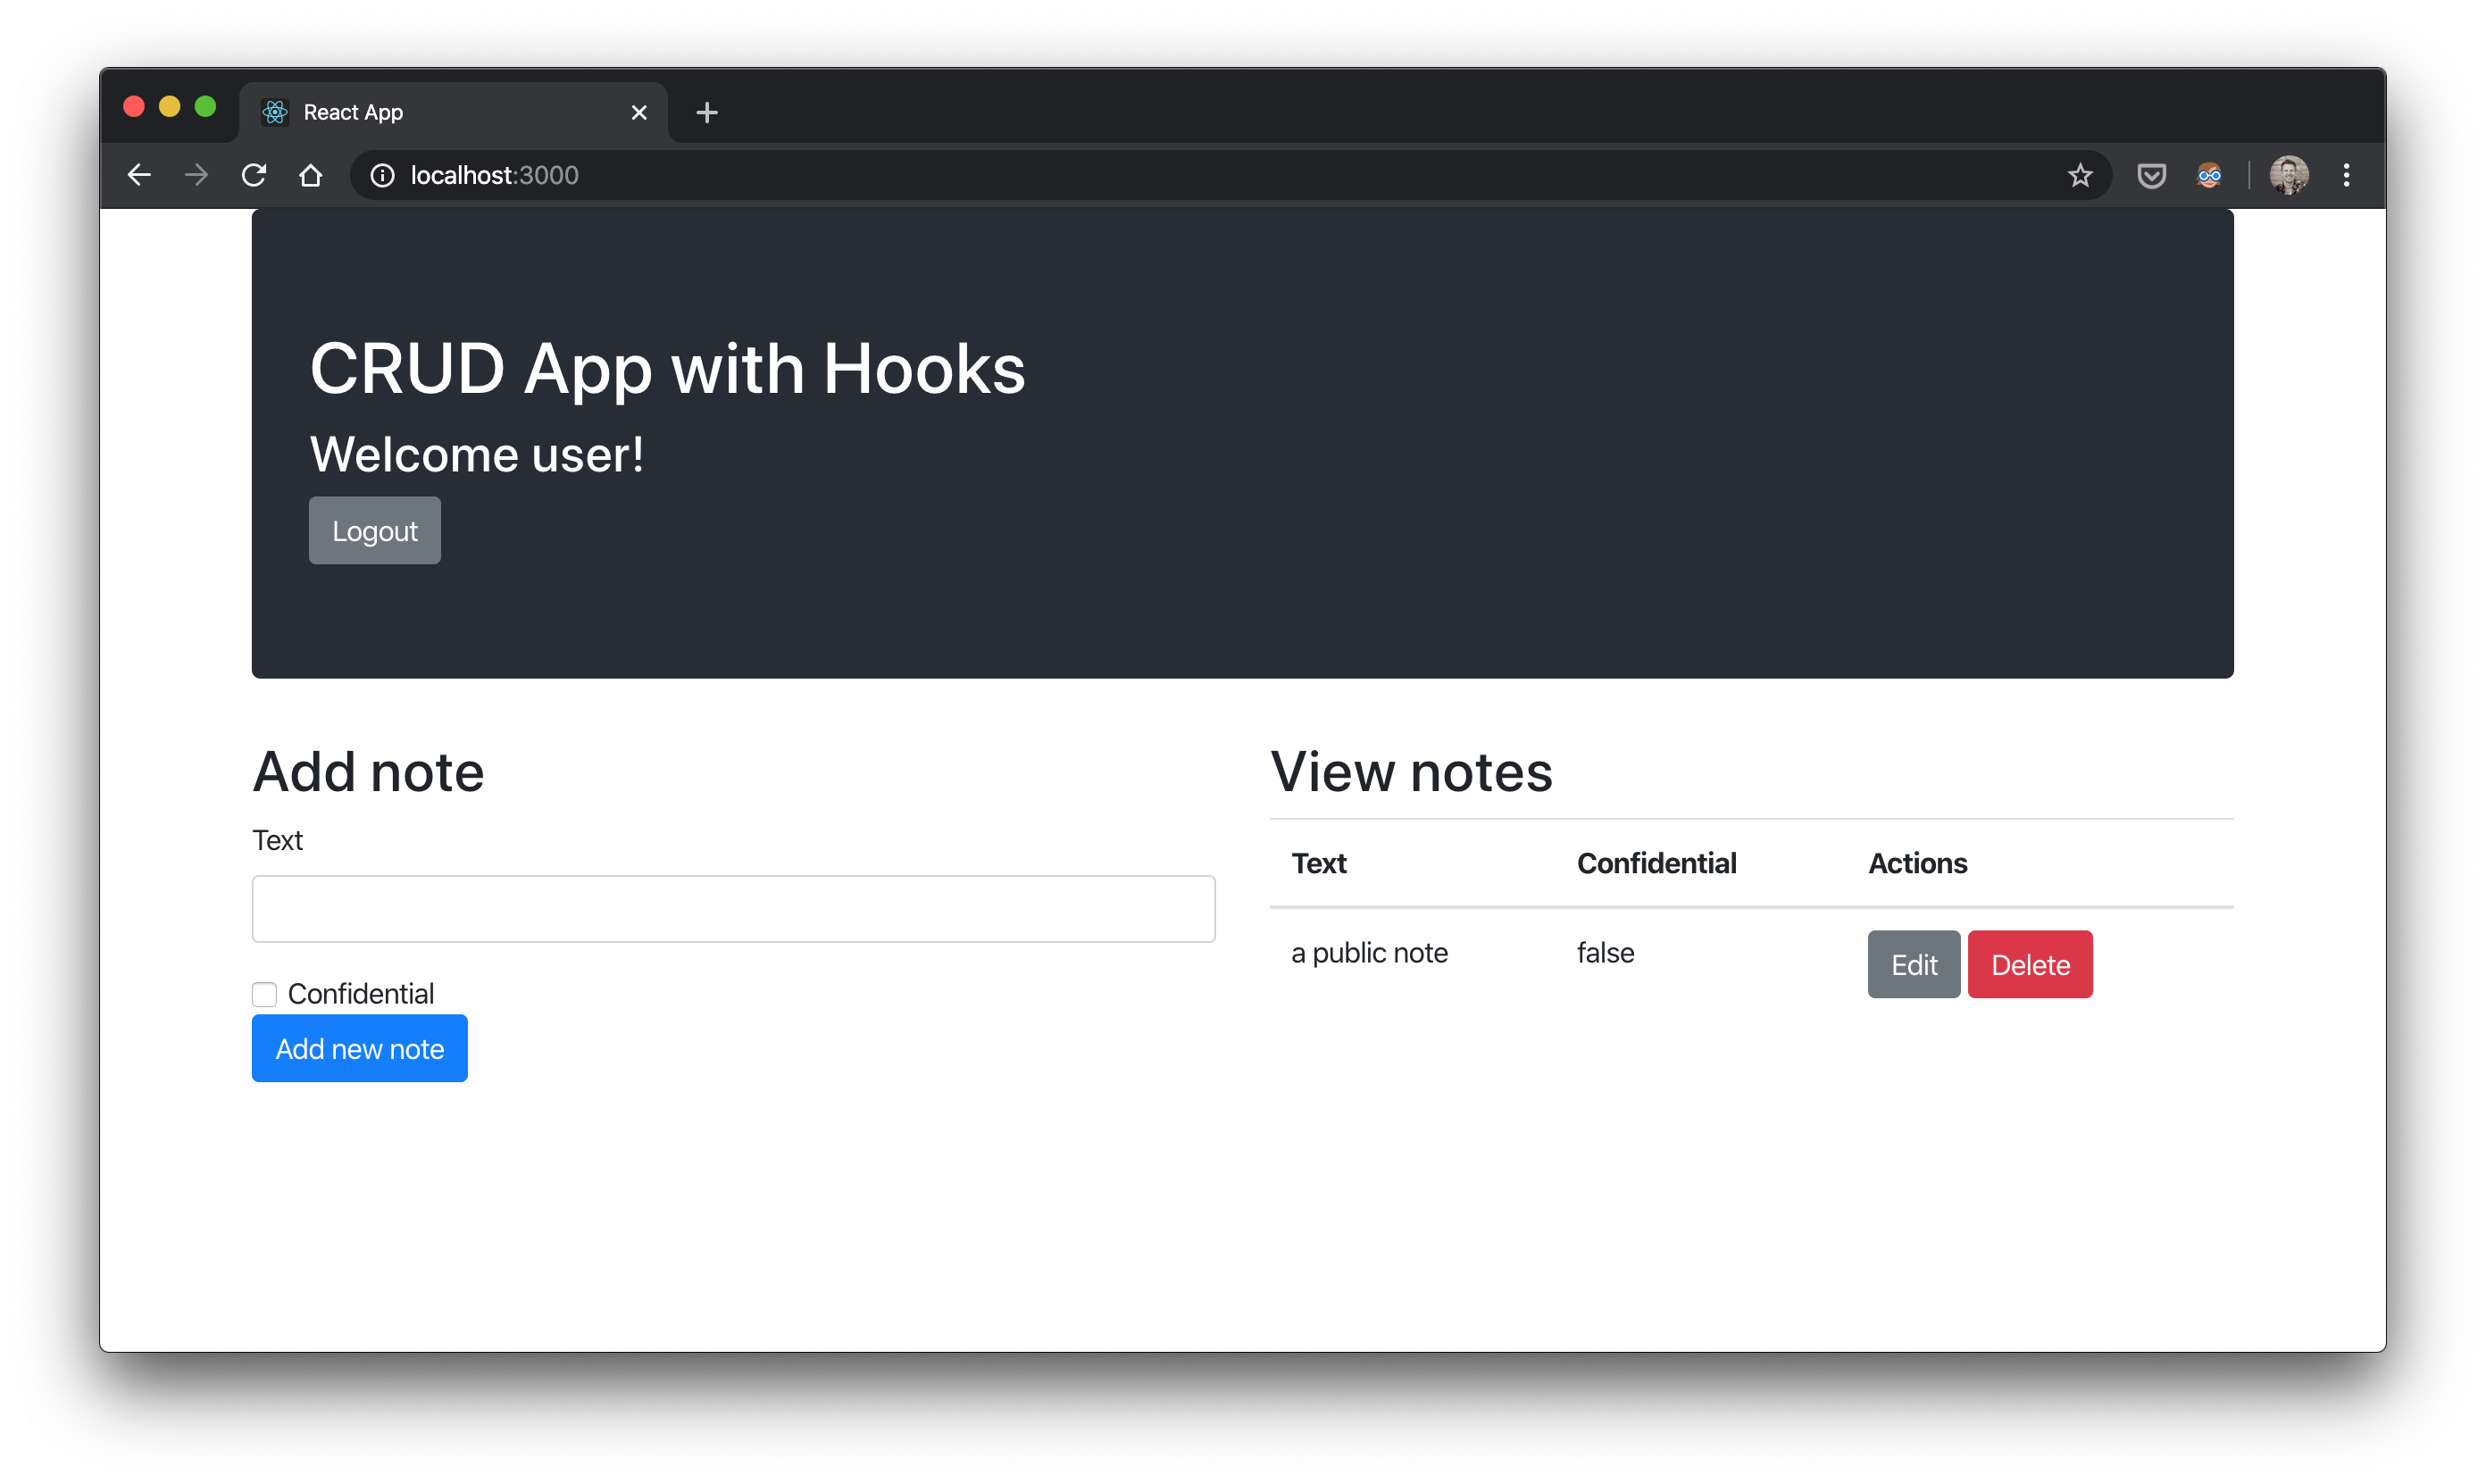
Now, without any code changes on our UI gateway, we should already benefit from the changes made to the note service and our configured policy service. If we were to log in as admin, we’d be able to view all notes–confidential or not. If we didn’t get assigned the identity role ROLE_USER on Keycloak, we wouldn’t be assigned the CanRead permission and would therefore get a “403 Forbiden” on the /api/notes GET call. If we do have the identity role ROLE_USER on Keycloak, we’ll get a filtered list of only non-confidential notes because we don’t have the CanReadConfidentialNotes permission.
Try it out with admin and user users and you’ll see the difference. Cool eh?
But why should only the note services get policies? What about the UI gateway? We should be able to give each application has its own roles and permissions. The authorization concerns in the UI gateway might overlap with those of the note service but it probably has its own distinct ones as well. For example, say, hypothetically, that we wanted Canadian users (not based on locale or IP but via a role) to have a specific UI experience. Since Canadians (also sometimes called “Canucks”) love snow, we might want to add a snowstorm effect when they’re logged in :)
Let’s try it!
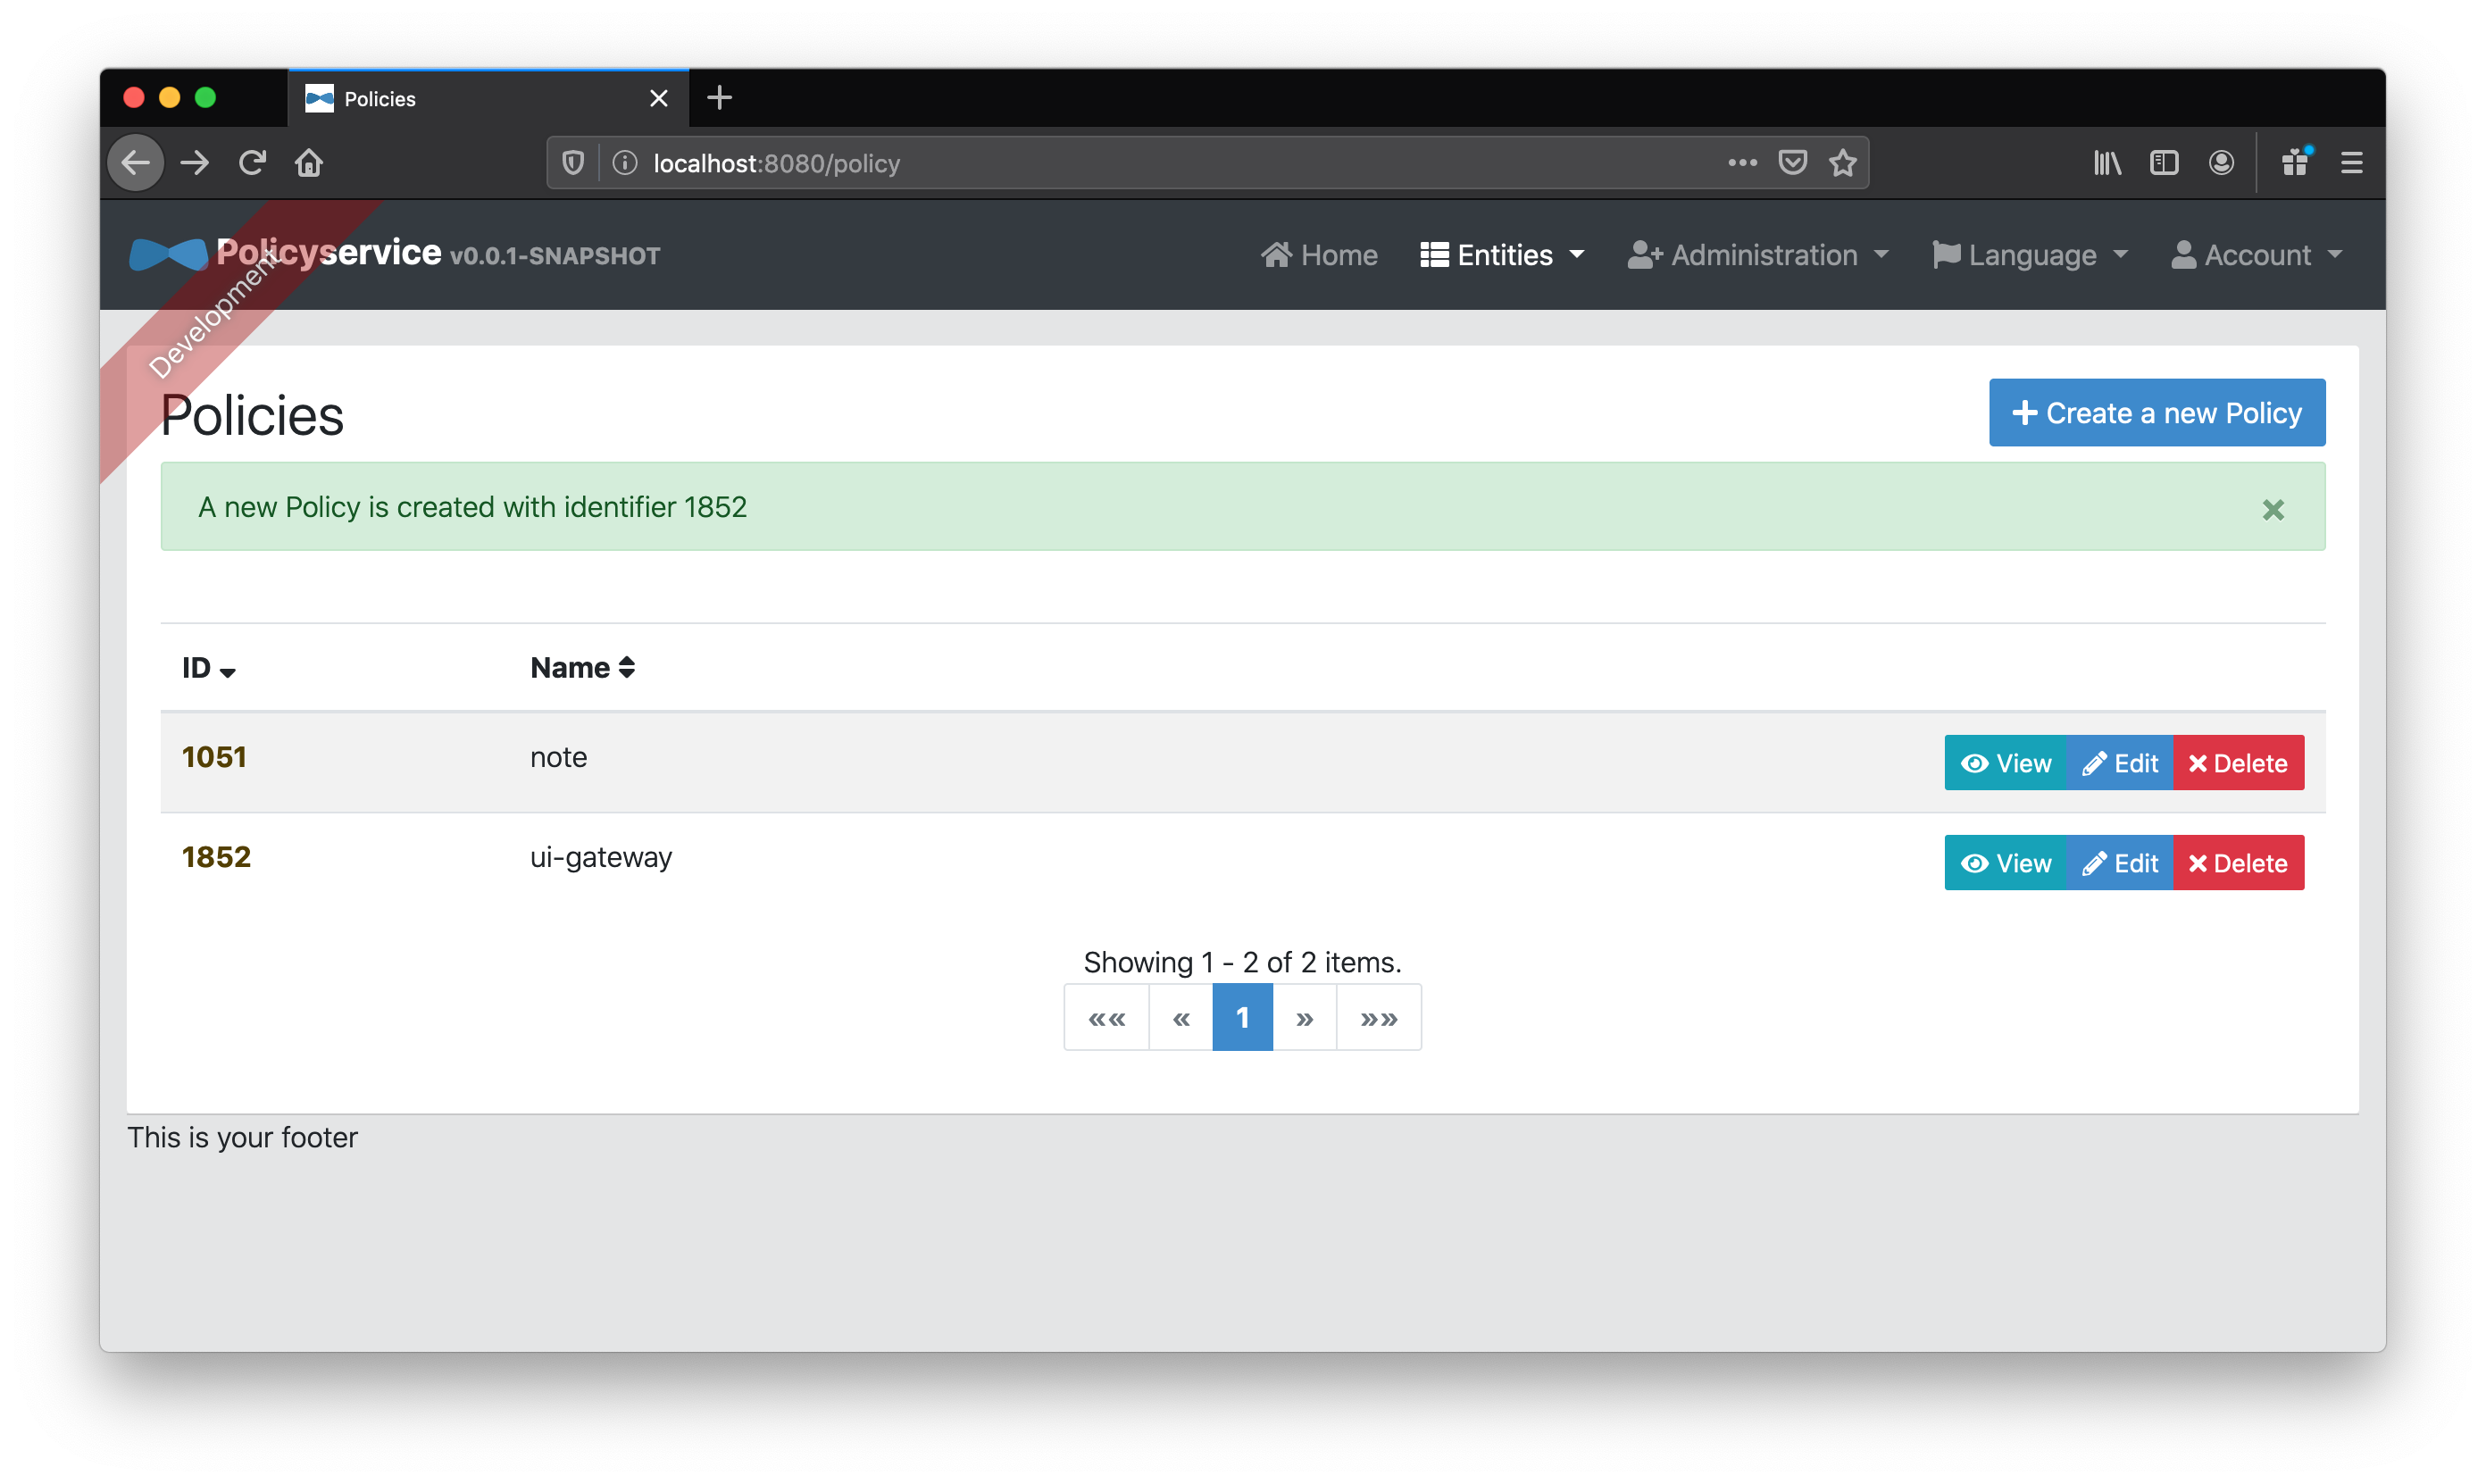
First we’ll add our ui-gateway policy.
Next, we’ll add our canuck “Role” entity belonging to the ui-gateway policy.
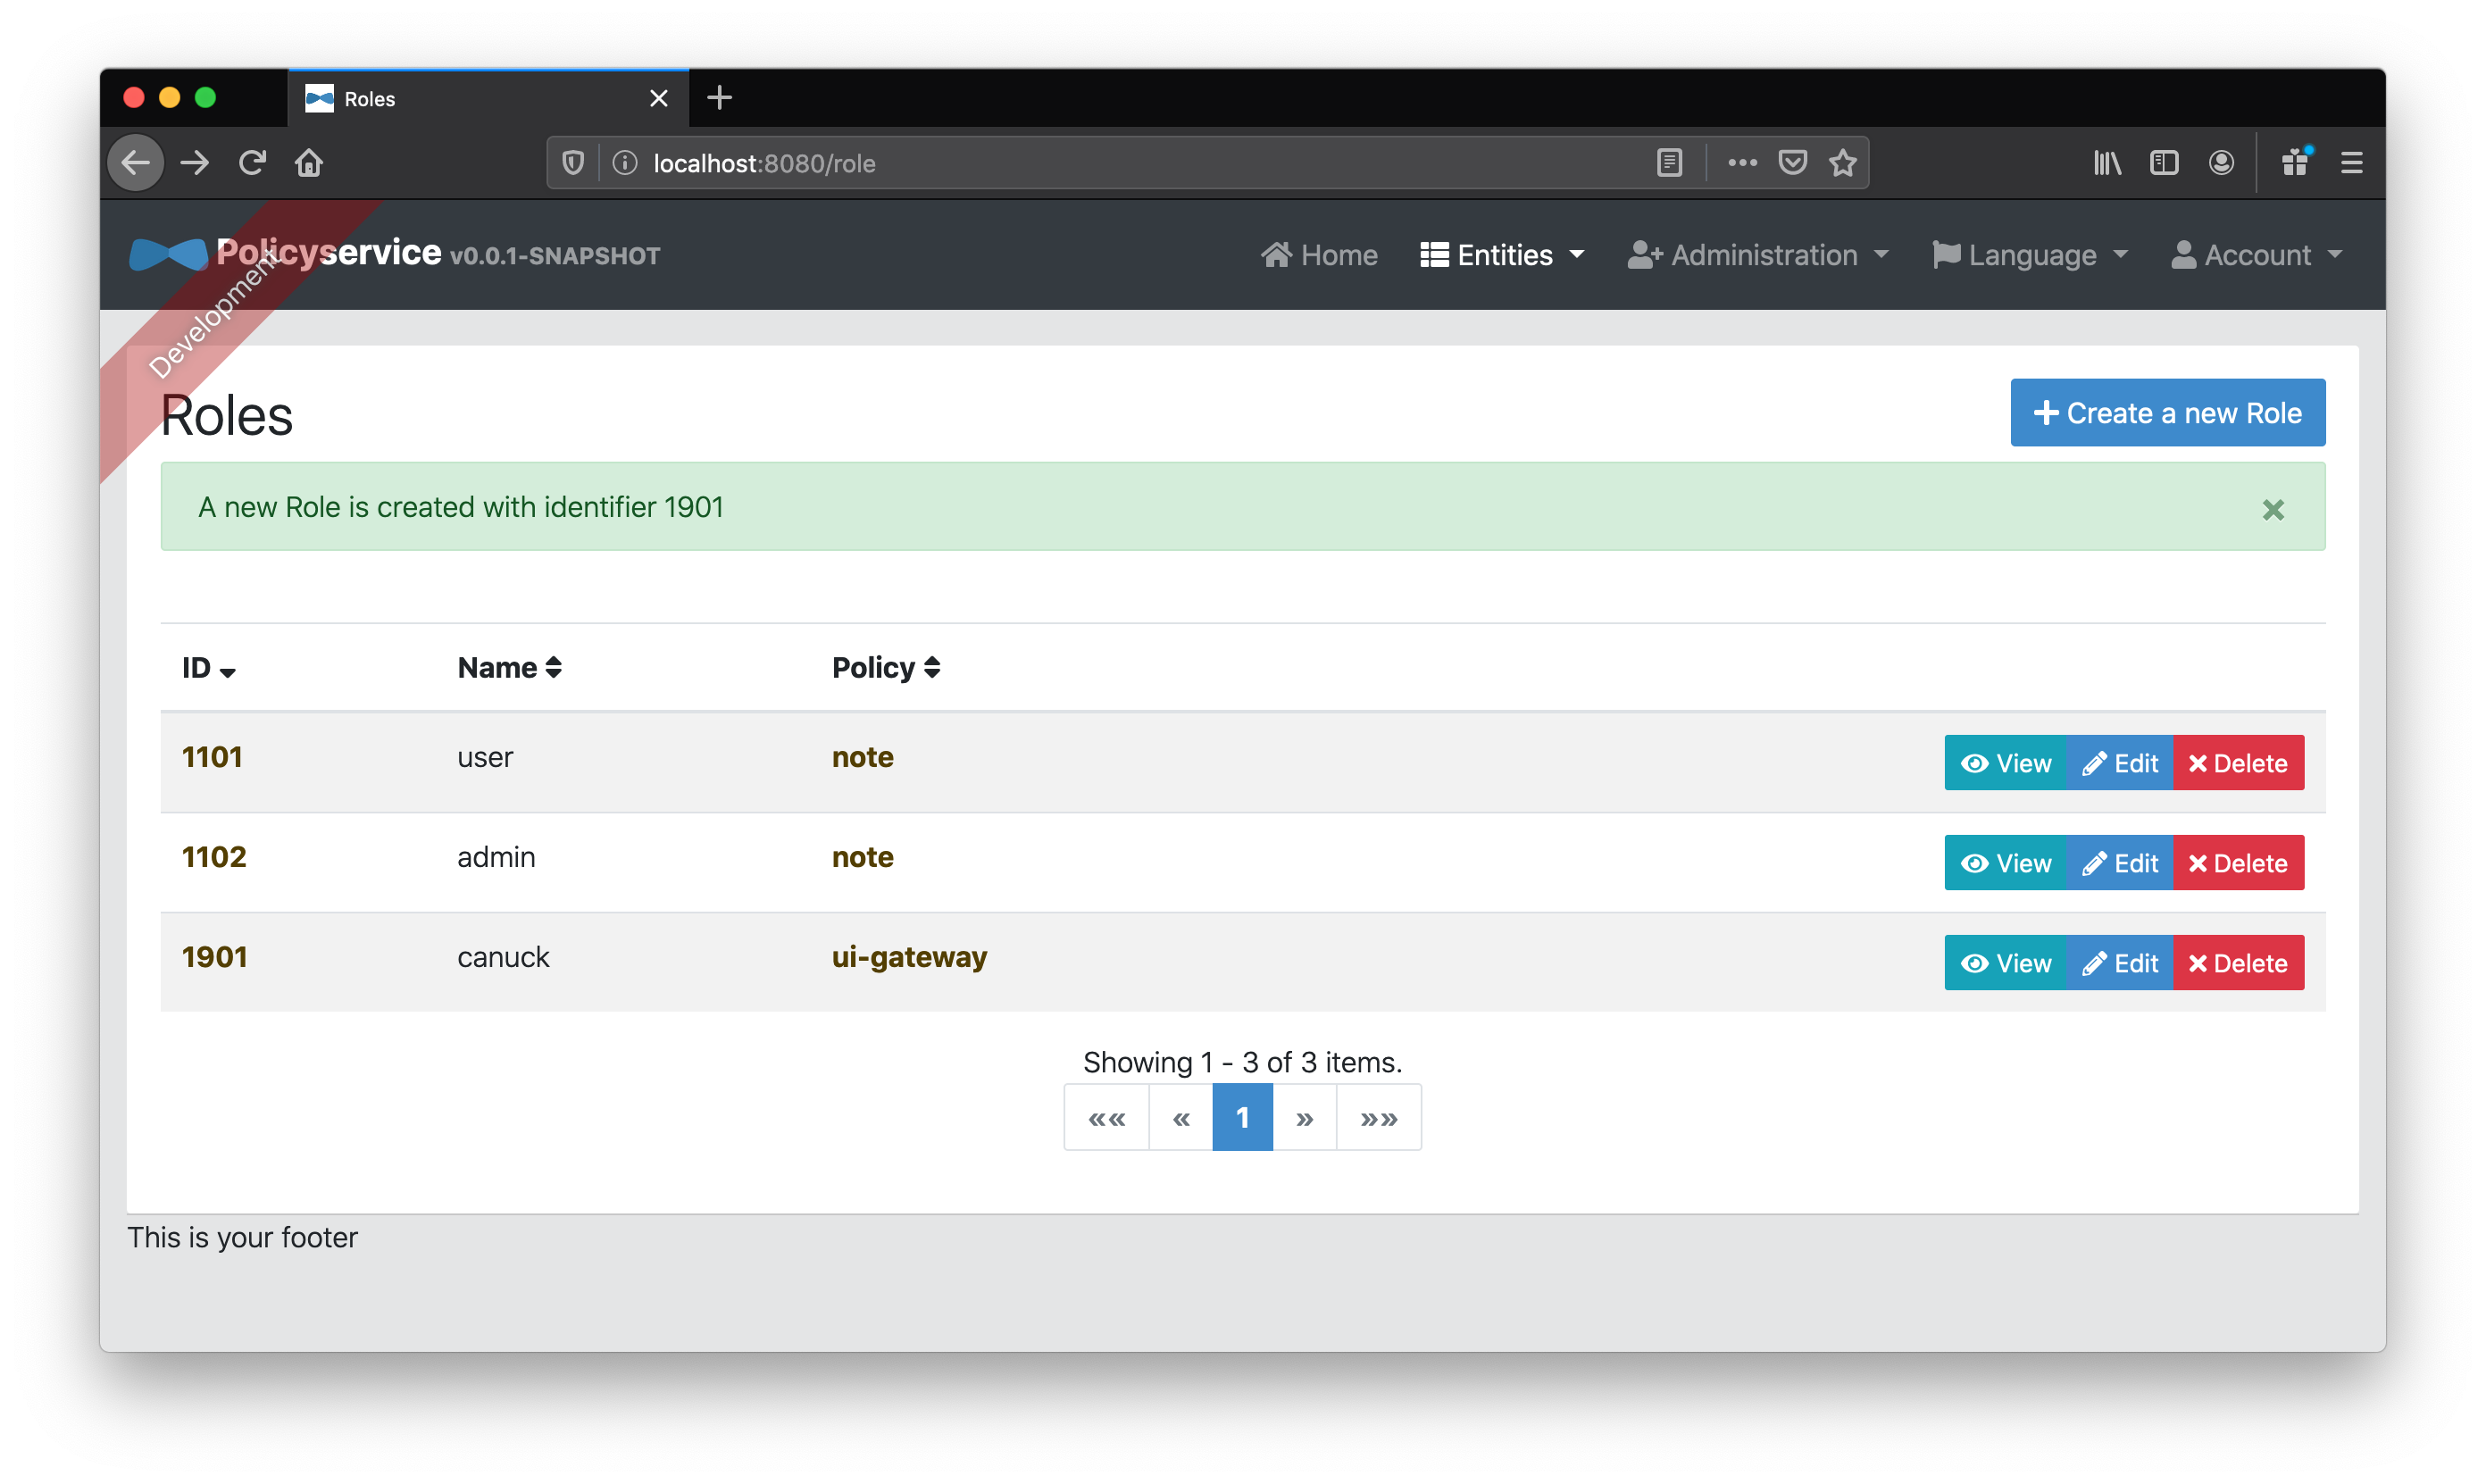
If we add a Snowing “Permission” entity associated to the canuck “Role” entity, then we’ll be able to use that to determine if we should show a snowstorm in the UI!
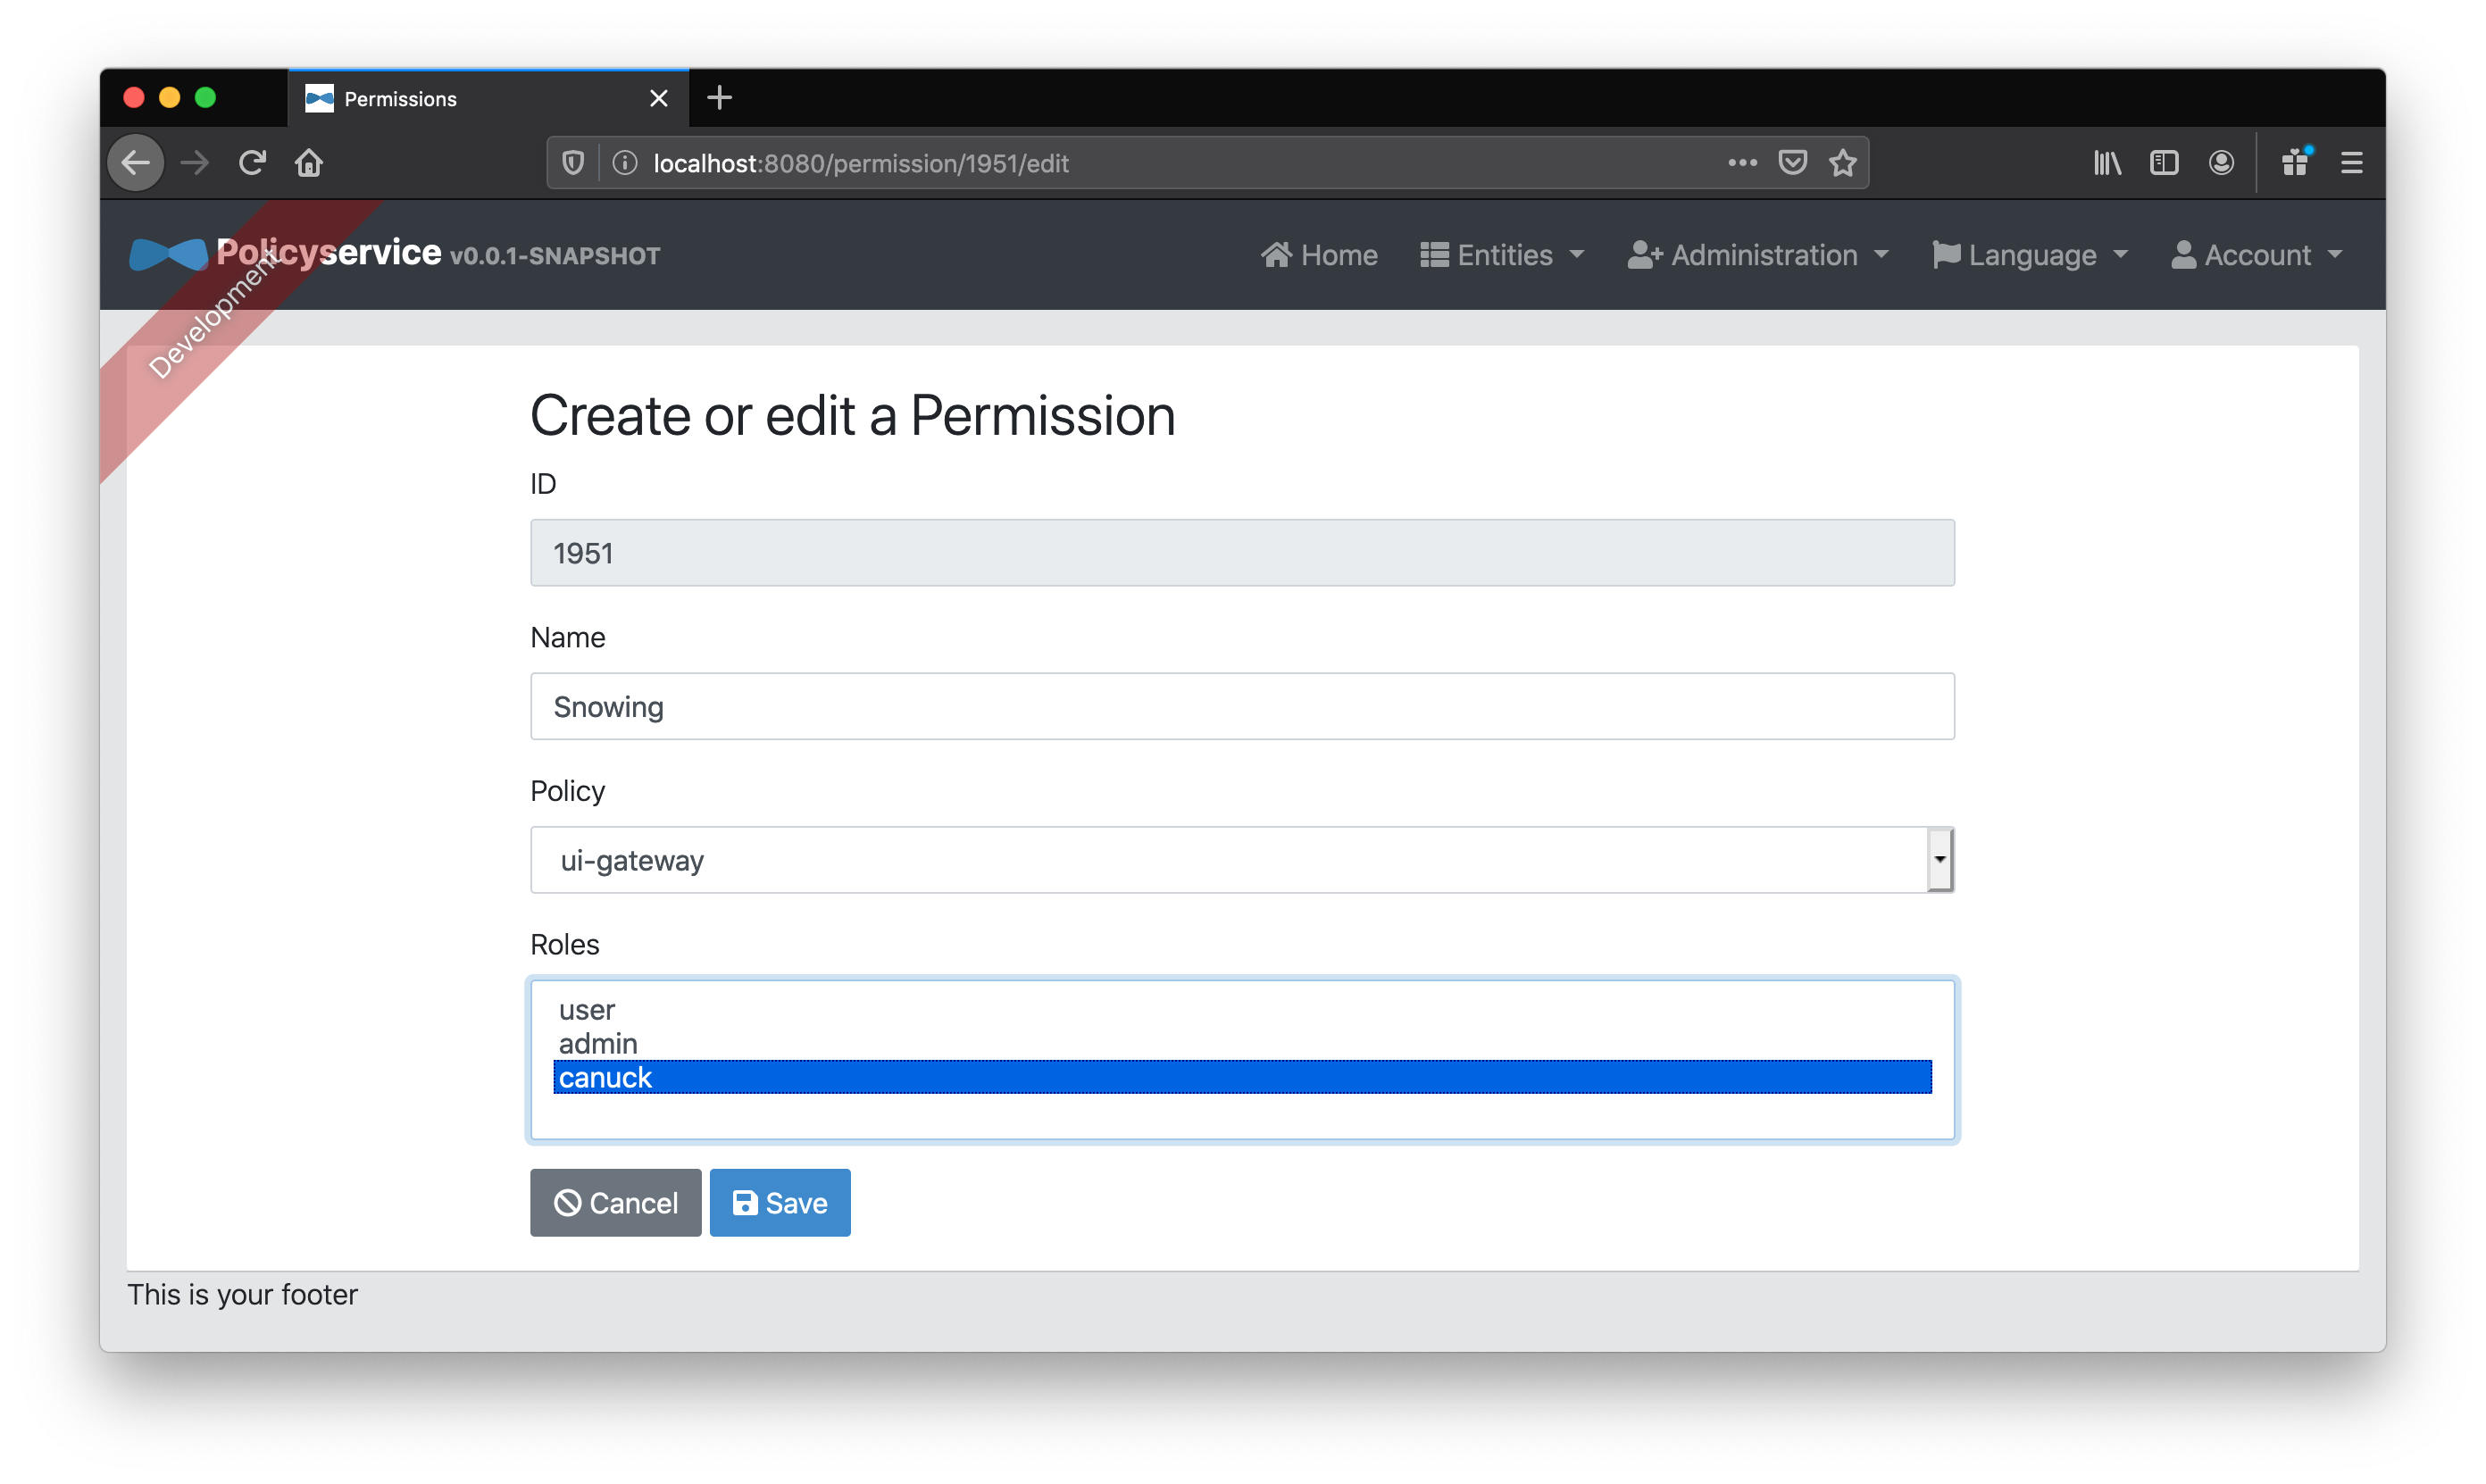
Now, how will our Keycloak users get this new canuck role? We could either
- map that specific user to the
canuck“Role” entity or - map a Keycloak identity role, let’s say
ROLE_ADMIN, to thecanuck“Role” entity on our policy service
Chosing the second option for simplicity, let’s blindly map all ROLE_ADMIN to canuck “Role” as well as the existing admin “Role”.

That’s it for our “policy service” configuration!
Customizing our UI gateway for more fine-grained authorization
Configure Spring Cloud Gateway to proxy “policy service” calls
How would we call the “policy service” from our React app to check those permissions we just setup? We’ll make our Spring Cloud Gateway backend proxy and relay calls along with our access token to the policy service. First, let’s add a route to our application.yml under spring.cloud.gateway.routes:
- id: policy-service
  uri: http://localhost:8080
  predicates:
    - Path=/api/policy-evaluation/**
  filters:
    - TokenRelay=
    - RemoveRequestHeader=Cookie
- RemoveResponseHeader=Set-Cookie # or else policy-service's XSRF-TOKEN clobbers the gateway's!Tip: You’ll probably want to use a refresh token or else your calls will “401” after 5 minutes (the default access token expiry on the Keycloak instance). If so, you’ll want to add the offline_access scope to your client registration and, until an issue with TokenRelayGatewayFilterFactory is resolved, use an alternate GatewayFilterFactory that supports refresh tokens and refer to it, TokenRelayWithTokenRefresh, in your application.yml, as your filter instead of TokenRelay.
Now that our backend is configured, calls from our React UI, such as
const response = await fetch('/api/policy-evaluation?policy=ui-gateway&permission=' + permission);will be automatically proxied along to the policy service with the access token set in the Authorization header!
Changing the React UI to use “policy service” permissions
Let’s change our React application to use our Snowing permission. In order to display our snowstorm, we first need to add react-snowstorm to our package dependencies by going to our src/main/app directory in a terminal and running:
npm install --save react-snowstormNow that we have our new dependency, let’s use it in App.tsx:
import SnowStorm from 'react-snowstorm';

const App = () => {

  const [ isSnowing, setSnowing ] = useState(false)

  const hasPermission = async (permission: string) => {
    const response = await fetch('/api/policy-evaluation?policy=ui-gateway&permission=' + permission);
    const body = await response.text()
    return body === 'true'
  }

  useEffect(() => {
    async function runAsync() {
      try {
        // ...
          setSnowing(await hasPermission('Snowing'))
        // ...
      } catch {
      }
    }
    runAsync()
  }, [])

  return (
    <Container>
      <Jumbotron id="jumbotron">
        <h1>CRUD App with Hooks</h1>
        {isAuthenticated ?
        <>
          <Form action="/logout" method="POST">
            <Input type="hidden" name="_csrf" value={cookies['XSRF-TOKEN']}/>
            <h3>Welcome {authenticatedUser}!</h3><Button color="secondary">Logout</Button>
          </Form>
          {isSnowing && <SnowStorm targetElement="jumbotron"/>}
        </> :
        <Button onClick={login}>Login</Button>
        }
      </Jumbotron>

      <!-- ... -->
    </Container>
  )
}
Above we’ve…
- imported the
SnowStormcomponent fromreact-snowstorm - used hooks to set the initial state of
isSnowingtofalseand thatsetSnowingis the function with which one can set its new value - defined a
hasPermissionfunction with a stringpermissionparameter that calls our “policy service” to determine if the user has that permission - wrapped our logout form with an empty
<>and added theSnowStormcomponent ifisSnowingistrue - added an
idto ourJumbotroncomponent to reference viatargetElementin ourSnowStormcomponent
Unfortunately, that’s not quite enough. Since react-snowstorm isn’t a typed dependency we can’t use it yet. We get the following error:
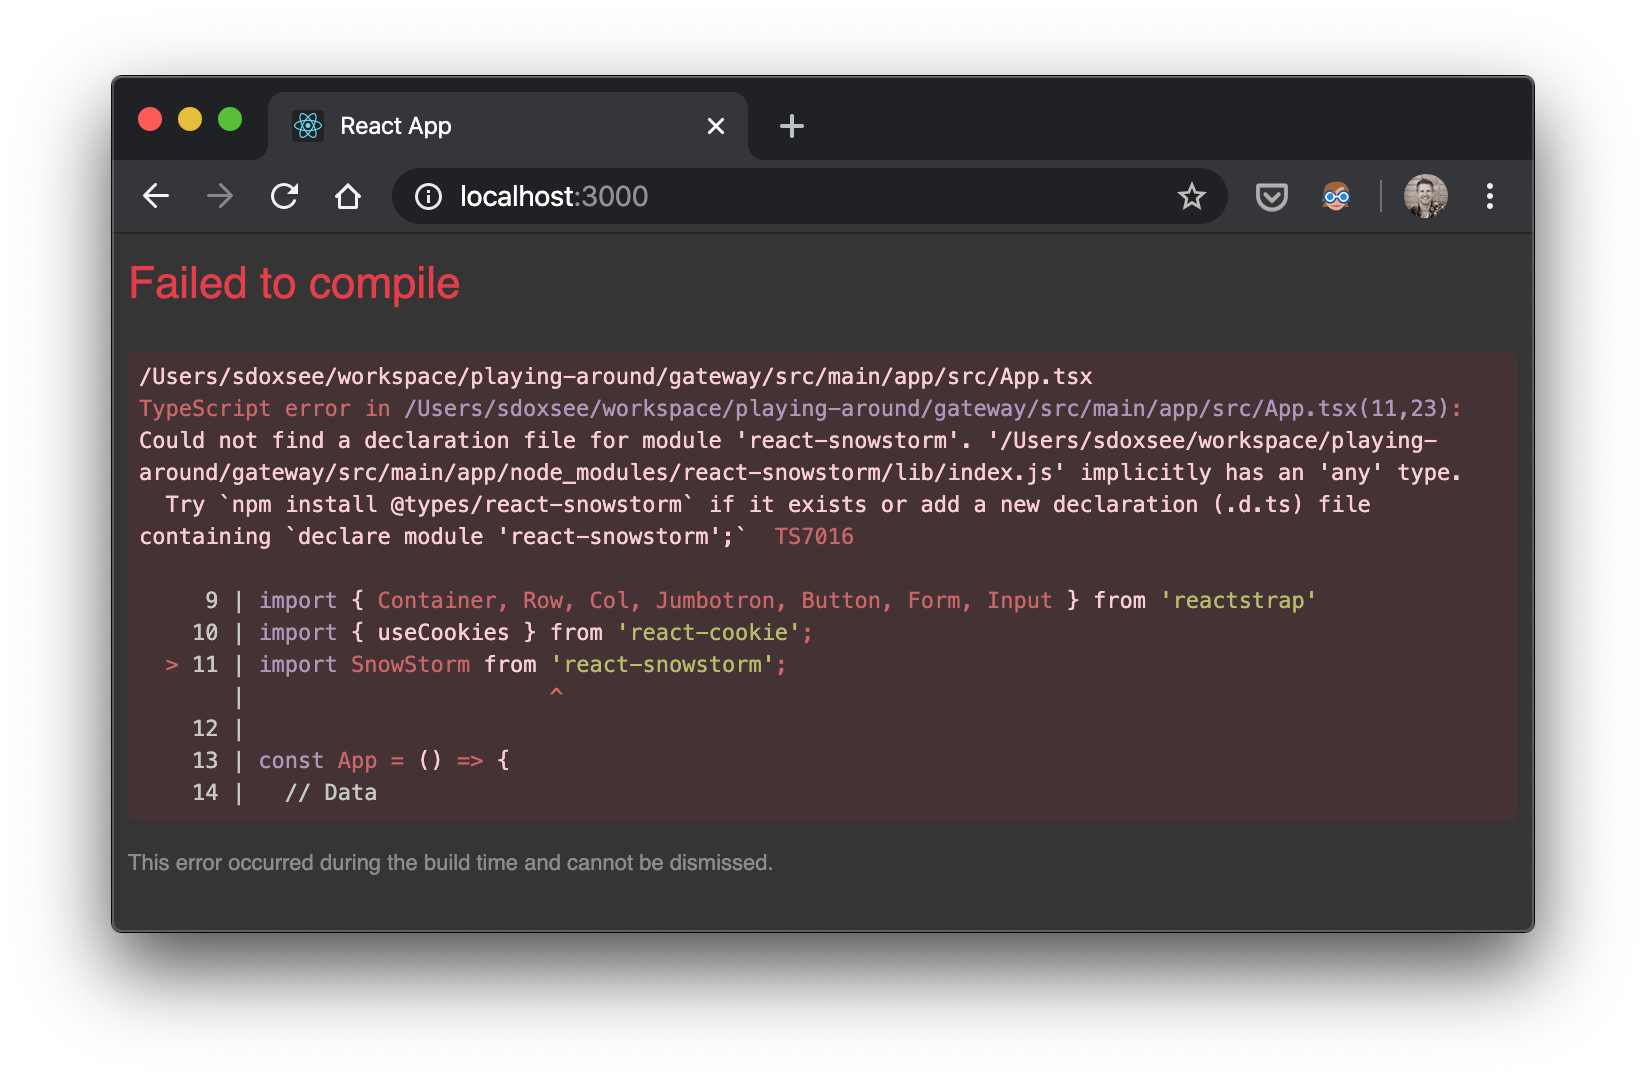
The easiest way to (satisfy)[https://stackoverflow.com/a/40211915/1098564] TypeScript is to simply add the following to src/main/app/src/react-app-env.d.ts–letting TypeScript know that the react-snowstorm exists:
declare module 'react-snowstorm';
Everything should be working now!
Note: you’ll probably need touch App.tsx to trigger recompilation compilation
It works!
When you sign in with admin, you’ll see all notes and the snow storm effect.
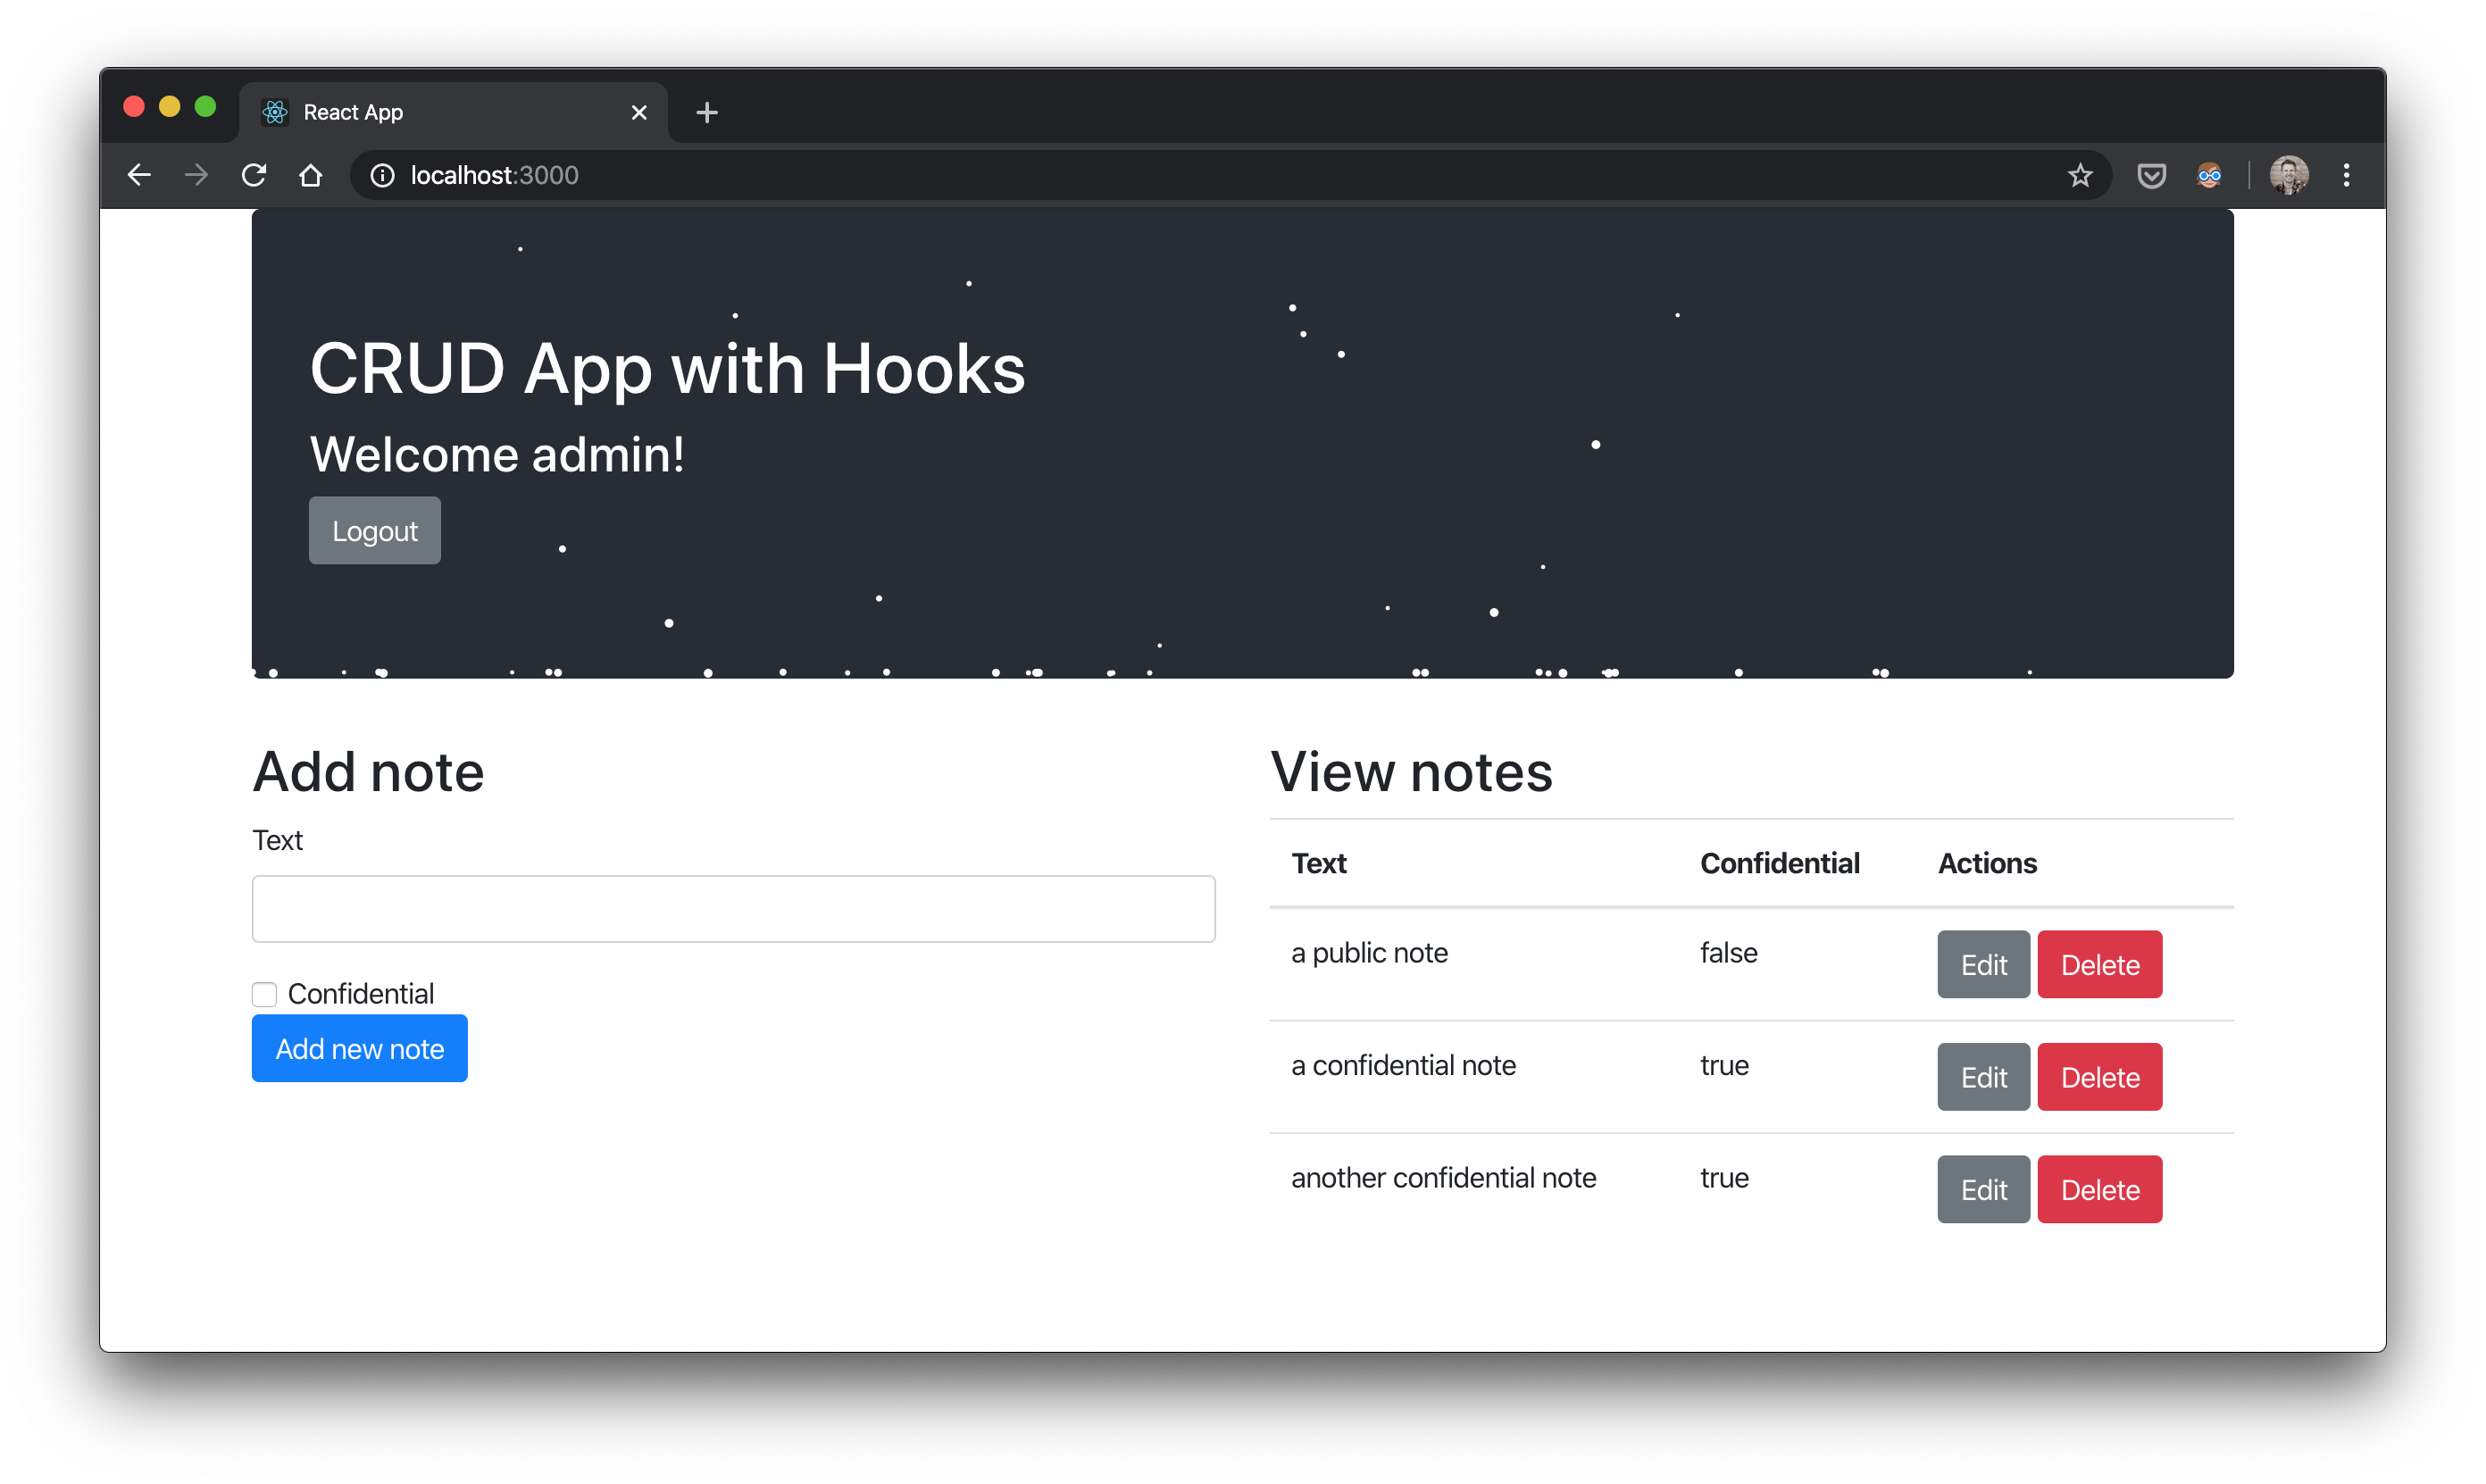
When you sign in with user, you’ll see only non-confidential notes and no snow storm effect.

Now we’ve got a microservices architecture that scales, uses a pretty great stack, and employs a “policy service” to control authorization for application-specific permissions!
There’s still a lot that can be done though…
- more services
- a more complex UI with nested routes
- caching
- pagination
Still. Not too shabby!
More “policy service” features
There are more “policy service” features that we didn’t explore yet, including:
- user records (for specific user permissions rather than identity role mappings)
- JWT settings to pick the claims you want to use for users and identity roles
- permission overrides that, for a specific user, let you add or remove permissions by overriding
- all defaults from identity role mappings
- permissions for a particular entity type (e.g. all
Noteentities) - permissions for a particular entity id of a particular entity type (e.g. the
Notewith id1234)
- querying roles as well as permissions
- more upcoming features to simplify the onboarding of large groups of users
If you’re interested in using or contributing to the “policy service”, direct message me on twitter. I’m hoping to offer it soon as a SaaS and/or open source it.
Conclusion
In the next post (Part 4), we’ll show how you can get all of this with full CI/CD and running on Google’s Kubernetes (GKE) using Jenkins X!
Please follow me on twitter or subscribe to be updated as each part of this series comes out.
If you’d like help with any of these things, find out how what I do and how you can hire me at Simple Step Solutions