
In this post, we’ll explore how to create a NestJS back-end that handles OpenID Connect authentication for a React app that it serves up with an express-session. The session store will share the MongoDB instance that is also used for storing cats.
Disclaimer: I’m not a cat guy. I’m using cats for this tutorial because the NestJS documentation did. However, I did take the picture for this post when we discovered 5 wild baby cats in our backyard! They’ve all since found loving homes :)
Table of Contents
Quickstart
The source can be found at https://github.com/sdoxsee/cats-nest
git clone git@github.com:sdoxsee/cats-nest.git
cd cats-nest
Start the back-end
cd back-end
npm install
Add `.env’ like this. I realize I’m sharing credentials for a Google OAuth 2.0 Client and a MongoDB user but that’s just for you to test this out easily. Please feel free create/use your own.
OAUTH2_CLIENT_PROVIDER_OIDC_ISSUER=https://accounts.google.com
OAUTH2_CLIENT_REGISTRATION_LOGIN_CLIENT_ID=339164422929-m219hbgevdrkoajb2s38sr5gl8vk1nc8.apps.googleusercontent.com
OAUTH2_CLIENT_REGISTRATION_LOGIN_CLIENT_SECRET=XZHJ_WS1pdAgkwW5U5zFQZZd
OAUTH2_CLIENT_REGISTRATION_LOGIN_SCOPE=openid profile
OAUTH2_CLIENT_REGISTRATION_LOGIN_REDIRECT_URI=http://localhost:3001/callback
OAUTH2_CLIENT_REGISTRATION_LOGIN_POST_LOGOUT_REDIRECT_URI=http://localhost:3001
SESSION_SECRET=super+secret+session+key
MONGODB_URL=mongodb+srv://kitty:cat@simplestep-cluster.fypyc.mongodb.net/myFirstDatabase?retryWrites=true&w=majority
Now you can start the backend on port 3000.
npm run start:devStart the front-end
In a new terminal
cd front-end
npm install
PORT=3001 npm start
Try it out
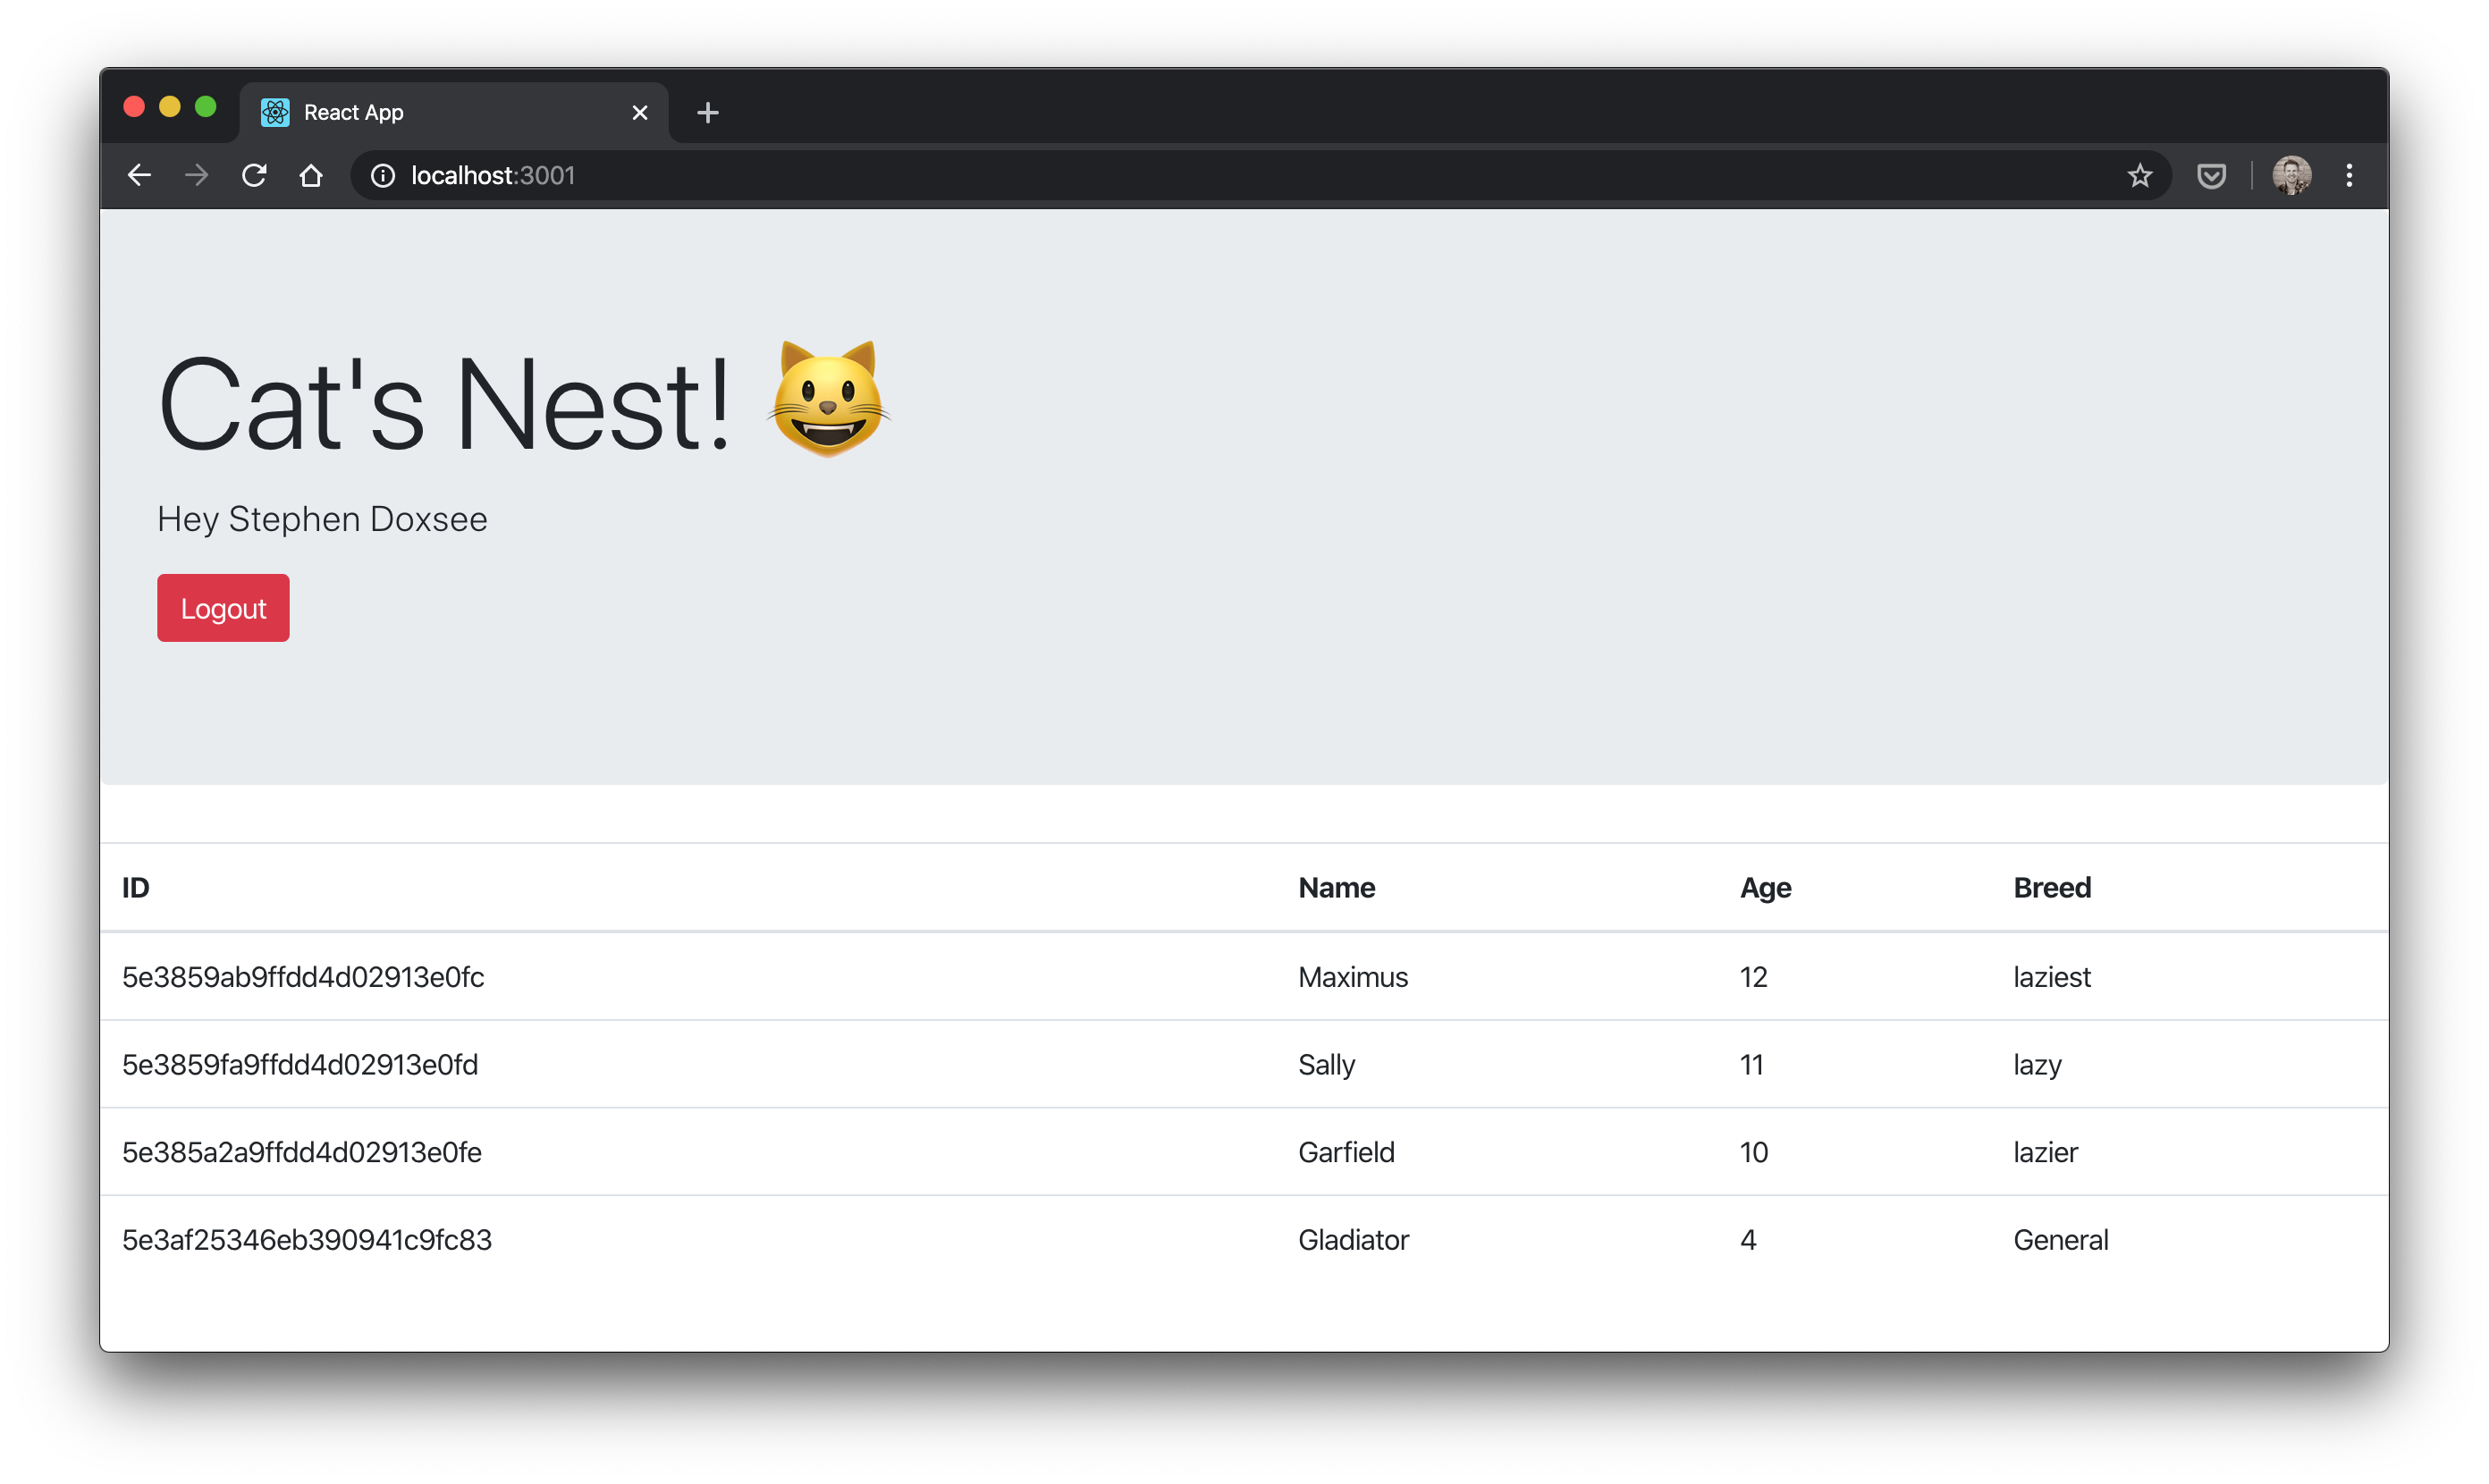
Your browser will open to http://localhost:3001. Click Login, sign in with your google credentials, give consent to “Cat’s Nest”, and you’ll see your name and any cats that are in the database!
Use https://httpie.org/ to create/read/update cat records. Here are some examples
- Create:
http -f POST localhost:3000/cats name=Gladiator age=4 breed=General - Read:
http localhost:3000/cats - Update:
http -f PUT localhost:3000/cats/5e3859ab9ffdd4d02913e0fc name=Maximus
Note: You’ll need to temporarily comment out @UseGuards(AuthenticatedGuard) on CatsController if you want to run the commands above since you’re not authenticated.
Why NestJS
JavaScript development can be a bit like the wild west. There are lots of ways to skin a cat (sorry, bad joke). I’ve done a fair bit on the front-end with JavaScript before but not so much on the back-end. NestJS promises to bring best-practice architecture and consistency to Node applications. It actually feels a lot like Spring Boot development (which is a win from my perspective).
Create the back-end
npm i -g @nestjs/cli
mkdir cats-nest && cd cats-nest
nest new back-end && cd back-end
If you run npm run start:dev you’ll see “Hello, World!” on http://localhost:3000! Cool, but we’ll want to go further than that ;) Let’s start working on Authentication
Add AuthModule
nest g module auth
nest g controller auth
nest g service auth
We won’t be using AuthService in this tutorial but we’re creating an empty one as this is where you’d probably check the Identity Provider’s user against what you care about in your own database.
Add dependencies
npm i --save @nestjs/passport passport openid-client @nestjs/config express-session @nestjs/mongoose mongoose connect-mongoHere’s what those dependencies are about:
- @nestjs/passport - NestJS modules for working with passport
- passport - Passport itself–authentication middleware for Node.js
- openid-client - OIDC certified client library with a passport strategy
- @nestjs/config - NestJS configuration support
- express-session - For a session-based application
- @nestjs/mongoose - NestJS modules for working with mongoose
- mongoose - Mongoose itself–Node.js ODM for MongoDB
- connect-mongo - Express session store that uses MongoDB
Add OidcStrategy
Let’s create an OpenID Connect passport strategy, based on the node-openid-client project.
// auth/oidc.strategy.ts
import { UnauthorizedException } from '@nestjs/common';
import { PassportStrategy } from '@nestjs/passport';
import { Strategy, Client, UserinfoResponse, TokenSet, Issuer } from 'openid-client';
import { AuthService } from './auth.service';

export const buildOpenIdClient = async () => {
  const TrustIssuer = await Issuer.discover(`${process.env.OAUTH2_CLIENT_PROVIDER_OIDC_ISSUER}/.well-known/openid-configuration`);
  const client = new TrustIssuer.Client({
    client_id: process.env.OAUTH2_CLIENT_REGISTRATION_LOGIN_CLIENT_ID,
    client_secret: process.env.OAUTH2_CLIENT_REGISTRATION_LOGIN_CLIENT_SECRET,
  });
  return client;
};

export class OidcStrategy extends PassportStrategy(Strategy, 'oidc') {
  client: Client;

  constructor(private readonly authService: AuthService, client: Client) {
    super({
      client: client,
      params: {
        redirect_uri: process.env.OAUTH2_CLIENT_REGISTRATION_LOGIN_REDIRECT_URI,
        scope: process.env.OAUTH2_CLIENT_REGISTRATION_LOGIN_SCOPE,
      },
      passReqToCallback: false,
      usePKCE: false,
    });

    this.client = client;
  }

  async validate(tokenset: TokenSet): Promise<any> {
    const userinfo: UserinfoResponse = await this.client.userinfo(tokenset);

    try {
      const id_token = tokenset.id_token
      const access_token = tokenset.access_token
      const refresh_token = tokenset.refresh_token
      const user = {
        id_token,
        access_token,
        refresh_token,
        userinfo,
      }
      return user;
    } catch (err) {
      throw new UnauthorizedException();
    }
  }
}
Create LoginGuard to handle the OIDC dance
// src/auth/login.guard.ts
import { ExecutionContext, Injectable } from '@nestjs/common';
import { AuthGuard } from '@nestjs/passport';

@Injectable()
export class LoginGuard extends AuthGuard('oidc') {
  async canActivate(context: ExecutionContext) {
    const result = (await super.canActivate(context)) as boolean;
    const request = context.switchToHttp().getRequest();
    await super.logIn(request);
    return result;
  }
}
Replace AuthController with this
// auth/auth.controller.ts
import {
  Controller,
  Get,
  Request,
  Res,
  UseGuards,
} from '@nestjs/common';
import { Response } from 'express';

import { LoginGuard } from './login.guard';
import { Issuer } from 'openid-client';

@Controller()
export class AuthController {

  @UseGuards(LoginGuard)
  @Get('/login')
  login() {}

  @Get('/user')
  user(@Request() req) {
    return req.user
  }

  @UseGuards(LoginGuard)
  @Get('/callback')
  loginCallback(@Res() res: Response) {
    res.redirect('/');
  }

  @Get('/logout')
  async logout(@Request() req, @Res() res: Response) {
    const id_token = req.user ? req.user.id_token : undefined;
    req.logout();
    req.session.destroy(async (error: any) => {
      const TrustIssuer = await Issuer.discover(`${process.env.OAUTH2_CLIENT_PROVIDER_OIDC_ISSUER}/.well-known/openid-configuration`);
      const end_session_endpoint = TrustIssuer.metadata.end_session_endpoint;
      if (end_session_endpoint) {
        res.redirect(end_session_endpoint +
          '?post_logout_redirect_uri=' + process.env.OAUTH2_CLIENT_REGISTRATION_LOGIN_POST_LOGOUT_REDIRECT_URI +
          (id_token ? '&id_token_hint=' + id_token : ''));
      } else {
        res.redirect('/')
      }
    })
  }
}
The two endpoints annotated with @UseGuards(LoginGuard) are those involved in the two kinds of authentication OAuth 2.0 authorization code flow requires (i.e. user and client)
/login: redirects to authorization endpoint of Identity Provider for front-channel user authentication/callback: receives thecodegrant from the Identity Provider and exchanges it, back-channel, for anid_tokenby means of client credential authentication
The /logout endpoint provides a way of using the end_session_endpoint if such an endpoint is discovered while the req.user object returned at the /user endpoint will be populated automatically by passport once the user is authenticated.
Add SessionSerializer
The way passport populates the req.user is by using a PassportSerializer. Passport serializes and deserializes user instances to and from the session using a PassportSerializer. Since we’re only using the user from the Identity Provider, we have a vanilla serializer that uses the user “as is”.
// src/auth/session.serializer.ts
import { PassportSerializer } from '@nestjs/passport';
import { Injectable } from '@nestjs/common';
@Injectable()
export class SessionSerializer extends PassportSerializer {
  serializeUser(user: any, done: (err: Error, user: any) => void): any {
    done(null, user);
  }
  deserializeUser(payload: any, done: (err: Error, payload: string) => void): any {
    done(null, payload);
  }
}
Update AuthModule
Let’s let our AuthModule know about our strategy, guard, and serializer.
// src/auth/auth.module.ts
import { Module } from '@nestjs/common';
import { PassportModule } from '@nestjs/passport';
import { OidcStrategy, buildOpenIdClient } from './oidc.strategy';
import { SessionSerializer } from './session.serializer';
import { AuthService } from './auth.service';
import { AuthController } from './auth.controller';

const OidcStrategyFactory = {
  provide: 'OidcStrategy',
  useFactory: async (authService: AuthService) => {
    const client = await buildOpenIdClient(); // secret sauce! build the dynamic client before injecting it into the strategy for use in the constructor super call.
    const strategy = new OidcStrategy(authService, client);
    return strategy;
  },
  inject: [AuthService]
};

@Module({
  imports: [
    PassportModule.register({ session: true, defaultStrategy: 'oidc' }),
  ],
  controllers: [AuthController],
  providers: [OidcStrategyFactory, SessionSerializer, AuthService],
})
export class AuthModule {}
Update AppModule
And let’s be sure to let our AppModule know about our ConfigModule so that we can use our .env config file!
// app.module.ts
import { Module } from '@nestjs/common';
import { AuthModule } from './auth/auth.module';
import { ConfigModule } from '@nestjs/config';
import { AppController } from './app.controller';
import { AppService } from './app.service';

@Module({
  imports: [
    ConfigModule.forRoot(), // so that we can pull in config
    AuthModule,
  ],
  controllers: [AppController],
  providers: [AppService],
})
export class AppModule {}
If you remember when we started our app originally, we just saw “Hello World!”. Let’s go to our AppController to add a link to login/logout and, if we have a user, display the user’s name instead!
import { Controller, Get, Request } from '@nestjs/common';
import { AppService } from './app.service';

@Controller()
export class AppController {
  constructor(private readonly appService: AppService) {}

  @Get()
  getHello(@Request() req): string {
    if (req.user) {
      return 'Hello, ' + req.user.userinfo.name + '! <a href="/logout">Logout</a>';
    } else {
      return this.appService.getHello() + ' <a href="/login">Login</a>';
    }
  }
}
Finally, we need to replace main.ts with the following to configure our session and to use passport with it.
// src/main.ts
import { NestFactory } from '@nestjs/core';
import { AppModule } from './app.module';
import * as session from 'express-session';
import * as passport from 'passport';
import * as connectMongo from 'connect-mongo';

async function bootstrap() {
  const app = await NestFactory.create(AppModule);

  // https://stackoverflow.com/a/39052956/1098564
  const MongoStore = connectMongo(session);

  // Authentication & Session
  app.use(session({
    store: new MongoStore({ url: process.env.MONGODB_URL}), // where session will be stored
    secret: process.env.SESSION_SECRET, // to sign session id
    resave: false, // will default to false in near future: https://github.com/expressjs/session#resave
    saveUninitialized: false, // will default to false in near future: https://github.com/expressjs/session#saveuninitialized
    rolling: true, // keep session alive
    cookie: {
      maxAge: 30 * 60 * 1000, // session expires in 1hr, refreshed by `rolling: true` option.
      httpOnly: true, // so that cookie can't be accessed via client-side script
    }
  }));
  app.use(passport.initialize());
  app.use(passport.session());

  await app.listen(3000);
}
bootstrap();
If we drop the .env file in and start the app with npm run start:dev, we’ll see an error
node_modules/connect-mongo/src/types.d.ts:8:23 - error TS2688: Cannot find type definition file for 'express-session'.
We can fix that by adding type definitions for the express-session library
npm i --save-dev @types/express-sessionNow, when we go to http://localhost:3000/login, we’ll be directed to Google for user authentication!
Add some Cat CRUD
Add AuthenticatedGuard
In order to prevent unauthorized calls from disturbing our cats, let’s create a generic AuthenticatedGuard that only allows calls by authenticated users on the annotated controller class or method.
// src/common/guards/authenticated.guard.ts
import { ExecutionContext, Injectable, CanActivate } from '@nestjs/common';

@Injectable()
export class AuthenticatedGuard implements CanActivate {
  async canActivate(context: ExecutionContext) {
    const request = context.switchToHttp().getRequest();
    return request.isAuthenticated();
  }
}
Add CatsModule
Create the CatsModule and related controller and service
nest g module cats
nest g controller cats
nest g service cats
Now, copy paste from the NestJS sample app providing the basics, from controller to model, to create Cat collections on MongoDB. See https://github.com/nestjs/nest/tree/master/sample/06-mongoose/src/cats and replace the generated files with the files from the repository.
Let’s annotate the CatsController with @UseGuards(AuthenticatedGuard) to protect its endpoints and add an update method.
  @Put(':id')
  async update(@Param() params, @Body() createCatDto: CreateCatDto) {
    await this.catsService.update(params.id, createCatDto);
  }
and let’s add an update method to CatsService
  async update(id: string, createCatDto: CreateCatDto): Promise<Cat> {
    const updatedCatDto = this.catModel.findByIdAndUpdate(id, createCatDto, { new: true });
    return updatedCatDto;
  }
Configure MongoDB
Finally, we’ll add the following to our imports array in our AppModule
MongooseModule.forRoot(process.env.MONGODB_URL), // so that we can use MongooseCreate the front-end
For the front-end we’ll be using create-react-app to build a react application with TypeScript.
npx create-react-app front-end --template typescript --use-npm
cd front-end
Add reactstrap
npm i --save bootstrap reactstrap
npm i --save-dev @types/reactstrap
Add import 'bootstrap/dist/css/bootstrap.min.css'; to index.tsx
Add Cat interface
// cat.interface.tsx
export interface Cat {
  readonly _id: string;
  readonly name: string;
  readonly age: number;
  readonly breed: string;
}
Add CatsTable component
// cats.table.tsx
import React from 'react'
import { Table } from 'reactstrap'
import { Cat } from './cat.interface'

interface Props {
  cats: Cat[]
}

const CatsTable = (props: Props) => (
  <Table hover responsive>
    <thead>
      <tr>
        <th>ID</th>
        <th>Name</th>
        <th>Age</th>
        <th>Breed</th>
      </tr>
    </thead>
    <tbody>
      {props.cats.length > 0 ? (
        props.cats.map(cat => (
          <tr key={cat._id}>
            <td>{cat._id}</td>
            <td>{cat.name}</td>
            <td>{cat.age}</td>
            <td>{cat.breed}</td>
          </tr>
        ))
      ) : (
        <tr>
          <td colSpan={3}>No cats</td>
        </tr>
      )}
    </tbody>
  </Table>
)

export default CatsTable
Replace App.tsx with…
// App.tsx
import React, { useState, useEffect } from 'react';
import './App.css';
import { Cat } from './cat.interface';
import CatsTable from './cats.table';
import { Jumbotron, Button } from 'reactstrap';

const App = () => {

  // Data
  const catsData : Cat[] = []
  const userData : User = {}

  interface User {
    id_token?: string,
    access_token?: string,
    refresh_token?: string,
    userinfo?: UserInfo
  }

  interface UserInfo {
    name?: string
  }

  // Setting state
  const [ cats, setCats ] = useState(catsData)
  const [ user, setUser ] = useState(userData)

  const getCats = async () => {
    try {
      const response = await fetch('/cats')
      const cats = await response.json()
      setCats(cats)
    } catch {
      // add better error handling here (e.g. 401?)
    }
  }

  useEffect(() => {
    // Create a scoped async function in the hook
    async function runAsync() {
      try {
        const response = await fetch('/user')
        const userResponse = await response.text()
        setUser(JSON.parse(userResponse))
        if (userResponse !== '') {
          getCats()
        }
      } catch(error) {
        // add better error handling here
      }
    }
    // Execute the created function directly
    runAsync()
  // https://stackoverflow.com/a/55854902/1098564
  // eslint-disable-next-line
  }, [])

  const login = () => {window.location.replace('/login')}
  const logout = () => {window.location.replace('/logout')}
  // https://stackoverflow.com/a/32108184/1098564
  const isEmpty = (obj: Object) => {return Object.keys(obj).length === 0 && obj.constructor === Object}

  return (
    <div>
      <Jumbotron>
        <h1 className="display-3">Cat's Nest! <span role="img" aria-label="smiling cat">😺</span></h1>
        {user && user.userinfo &&
        <p className="lead">Hey {user.userinfo.name}</p>
        }
        <p className="lead">
          {isEmpty(user) ?
          <Button color="primary" onClick={login}>Login</Button>
          :
          <Button color="danger" onClick={logout}>Logout</Button>
          }
        </p>
      </Jumbotron>
      {!isEmpty(user) && <CatsTable cats={cats}/>}
    </div>
  )
}

export default App;
Proxy requests to back-end in development
Finally, to get our client to proxy certain calls to our NestJS back-end on port 3000, we add http-proxy-middleware as per the CRA docs
npm i --save-dev http-proxy-middlewareAnd add the following setupProxy.js file to configure it
// setupProxy.js
// https://create-react-app.dev/docs/proxying-api-requests-in-development#configuring-the-proxy-manually
// https://github.com/chimurai/http-proxy-middleware
const proxy = require('http-proxy-middleware');
module.exports = function(app) {
  app.use(
    [
        '/cats',
        '/logout',
        '/login',
        '/user',
        '/callback',
    ],
    proxy({
      target: 'http://localhost:3000',
      changeOrigin: true,
      xfwd: true,
    })
  );
};
Start everything up
Note: Before we fire up the front-end on 3001, we need to change environment variables in the back-end’s .env file to point to 3001 instead of 3000. That’s because we want all redirects to come to the front-end in development. You’ll want to change the two environment variables back to 3000 when running this in production.
Start the back-end
npm run start:devIn another terminal window, start the front-end
PORT=3001 npm startWatch the magic happen!
Serve static resources in production
To serve up static resources (like a React application) in production, add the dependency @nestjs/serve-static
npm i --save @nestjs/serve-staticand add the following to our imports array in AppModule to point to our front-end build.
    ServeStaticModule.forRoot({
      rootPath: join(__dirname, '../..', 'front-end/build'),
}), // so that front-end can be served up by back-endNote: You’ll also want to remove AppController and AppService from AppModule so that the “Hello, World!” endpoint won’t conflict with the static resources we’re serving up.
References
- https://dev.to/nestjs/authentication-and-sessions-for-mvc-apps-with-nestjs-55a4
- https://medium.com/@nielsmeima/auth-in-nest-js-and-angular-463525b6e071
- https://github.com/nestjs/docs.nestjs.com/issues/99#issuecomment-557878531 (Nikolai Hegelstad)
Conclusion
Hope you enjoyed this tutorial. With NestJS and create-react-app, it’s pretty easy to create a clean session-based OIDC application!
Let me know what you think in the comments section.
Thanks for reading!
Please follow me on twitter or subscribe to be updated as each part of this series comes out.
If you’d like help with any of these things, find out how what I do and how you can hire me at Simple Step Solutions