
This is Part 1 of the series “Merry Microservices”
We’ll be introducing a simple confidential note OAuth 2.0 resource server with Spring Boot Webflux, and Spring Data R2DBC.
The source can be found on github at https://github.com/sdoxsee/merry-microservices/tree/part1.


Table of Contents
Preamble
I’ve spent most of my career doing Java development–especially with the Spring Framework. Java gets a fair bit of hate–some of it is merited while much of it is myth. Personally, I love it. One downside, however, is that it tends to use a lot of memory; traditional blocking architectures and thread pools at scale really bring this to light.
With Spring Webflux, the Spring Framework has been re-architected on Project Reactor and Netty to bring about more asynchronous, event-driven, non-blocking applications (i.e. “Reactive”). Spring Webflux has some advantages over Spring MVC including more efficient resource utilization (i.e. less threads => less memory). Those lead to cheaper cloud costs and more robust services. I like that. I find it hard to justify the resource requirements for the excessive threads in Spring MVC but, since I still love Java, Spring Webflux makes “Java in the cloud” much more palatable. It also can leverage the awesome autoconfiguration features of Spring Boot that can make it super-easy to use. Webflux has some limitations (e.g. lack of non-blocking libraries, etc.) and differences from the very support-rich servlet-based stack but we’ll see that it’s pretty cool!
Generate the project
Let’s go to start.spring.io and generate our note.zip
Dependencies? webflux,data-r2dbc,h2,oauth2-resource-server
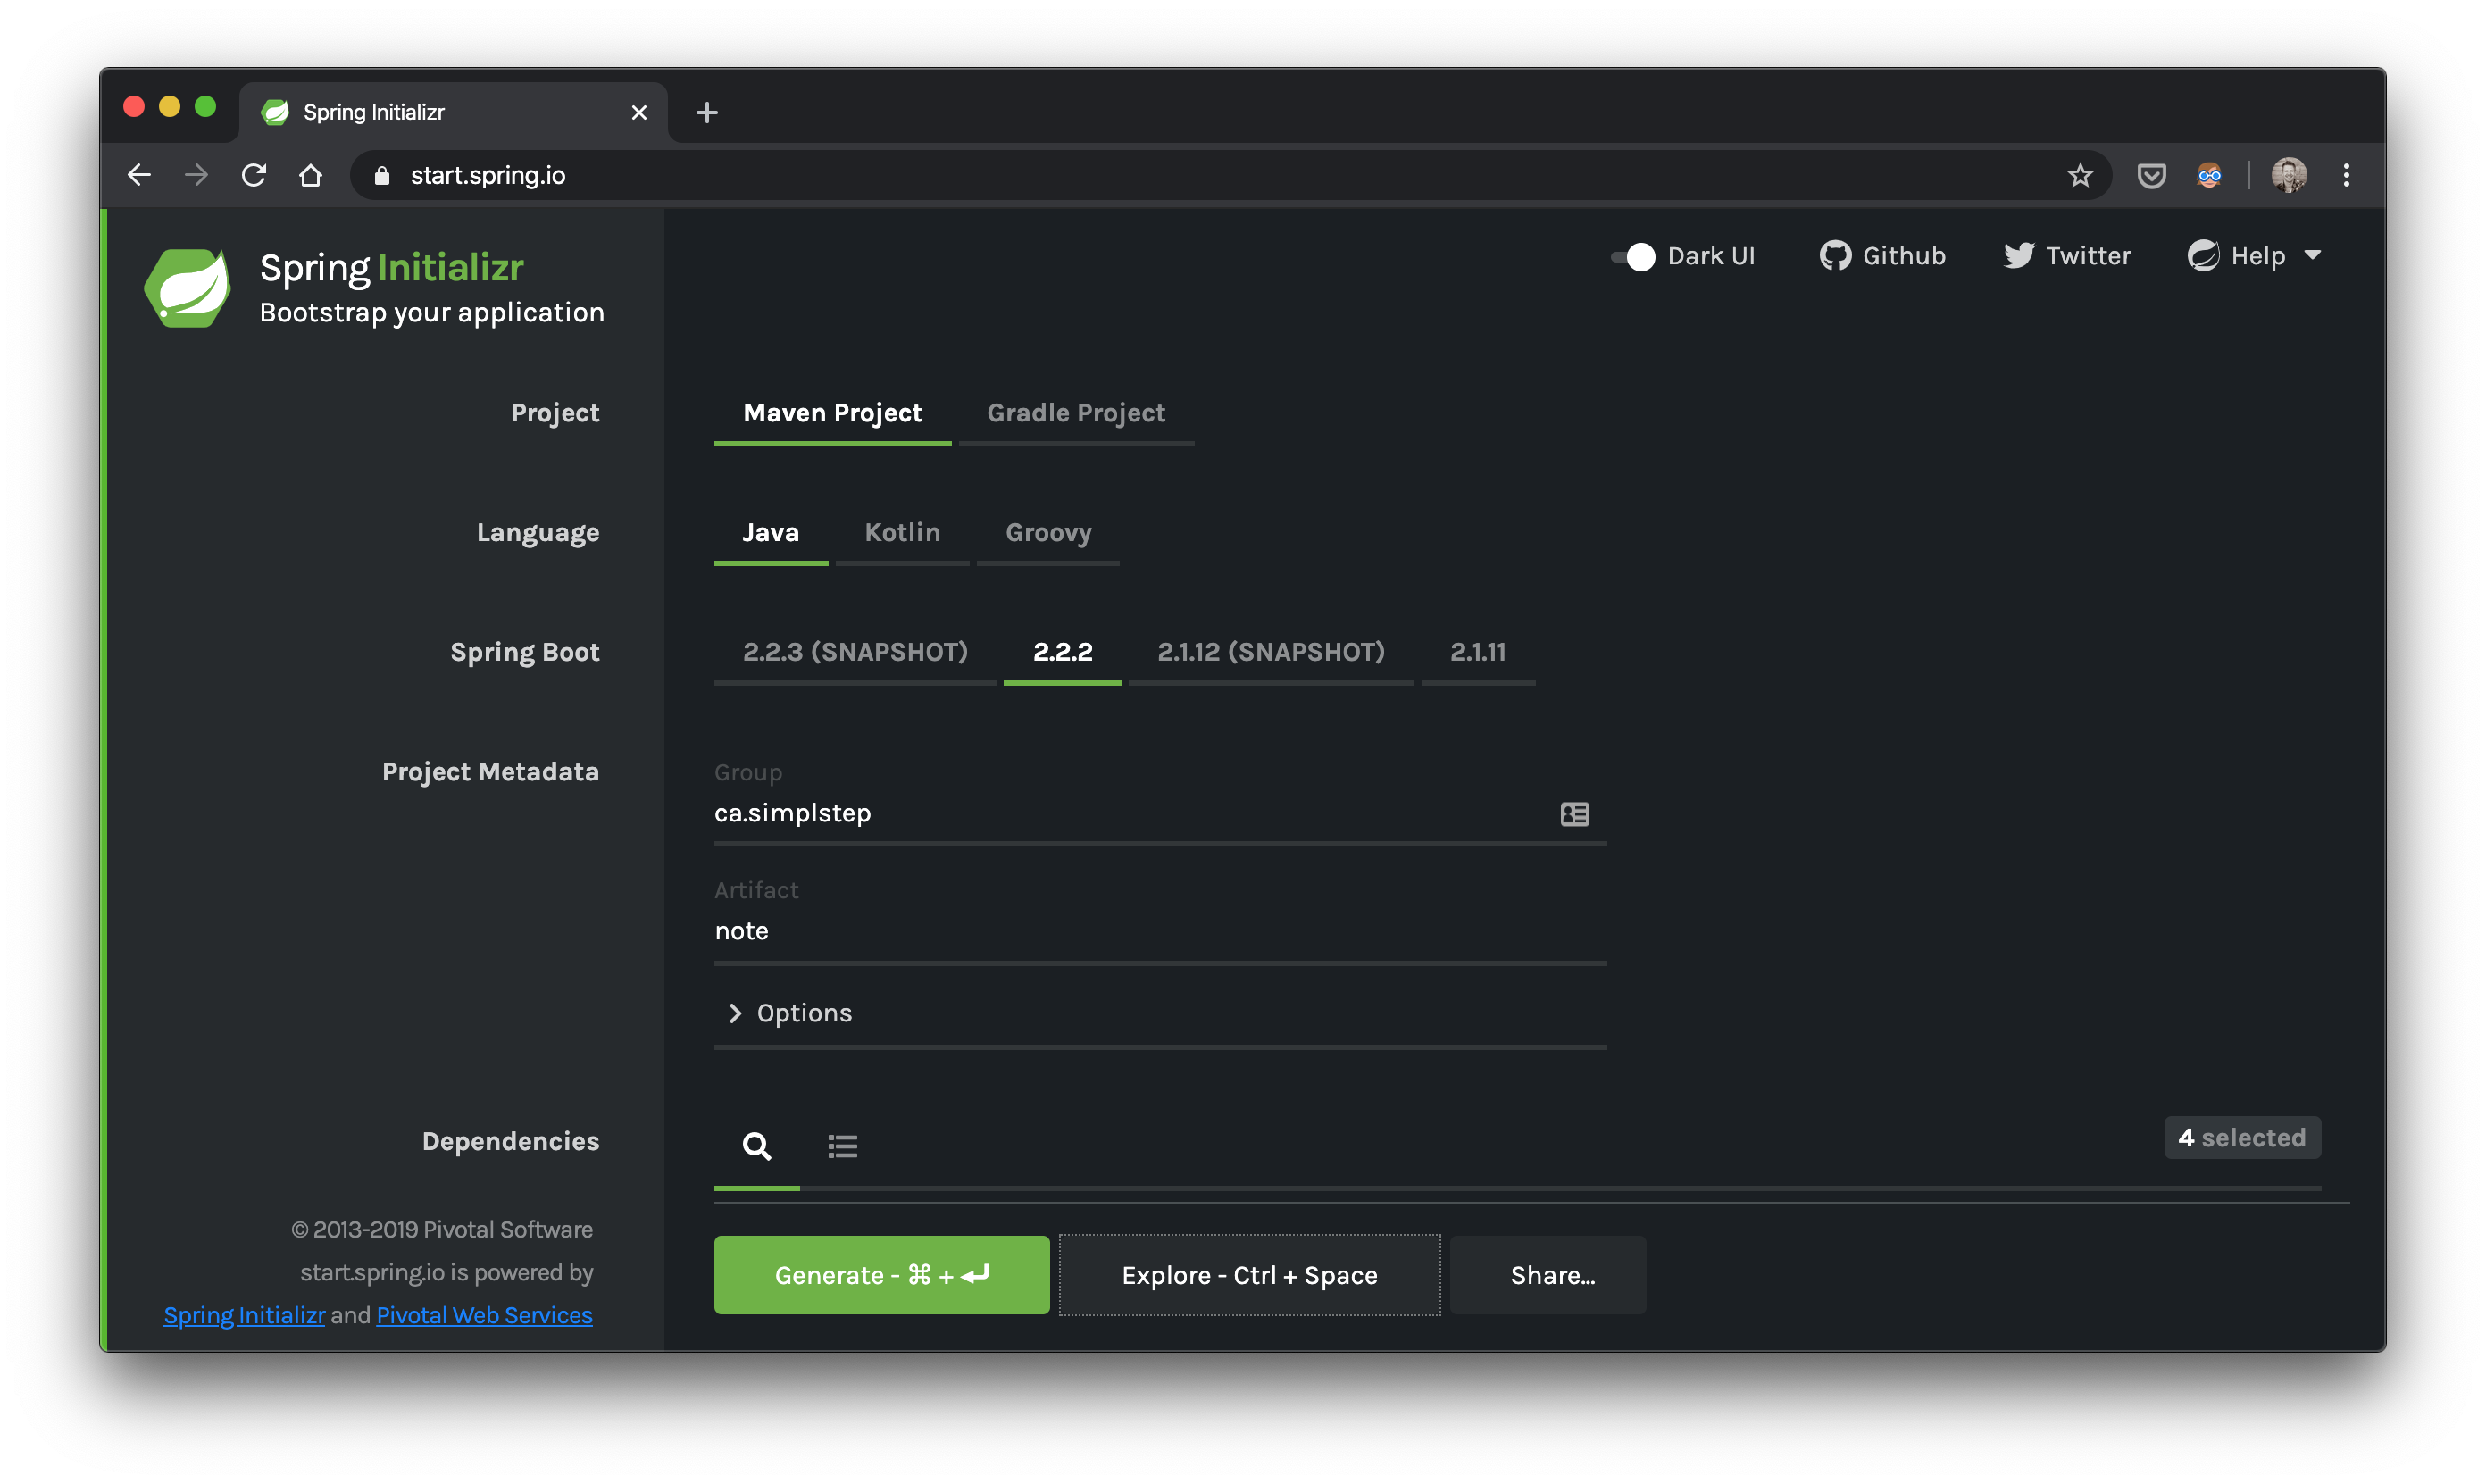
We won’t be changing the pom.xml from start.spring.io but I do want to point out that one of our dependencies is currently experimental:
spring-boot-starter-data-r2dbc– allows for the autoconfiguration of our reactive datasource
Add the domain
Below is our very simple, yet verbose, Note domain class, although, with the power of an IDE, it’s probably really easy to generate the getters/setters! The key thing to recongize here is that it’s not a JPA @Entity. It’s a plain class with an org.springframework.data.annotation.@Id on the id field.
class Note {

  @Id
  private Long id;
  private String text;
  private boolean confidential;

  public Long getId() {
    return id;
  }

  public void setId(Long id) {
    this.id = id;
  }

  public String getText() {
    return text;
  }

  public void setText(String text) {
    this.text = text;
  }

  public boolean isConfidential() {
    return confidential;
  }

  public void setConfidential(boolean confidential) {
    this.confidential = confidential;
  }

  static Note create(String text) {
    return create(text, false);
  }

  static Note create(String text, boolean confidential) {
    Note note = new Note();
    note.text = text;
    note.confidential = confidential;
    return note;
  }
}
Add the controller
Functional Routes
Now that we know what kind of domain class we’ll be working with, let’s switch over to our controller level and add our routes using the new functional routing available in Webflux
@Configuration
class WebConfig implements WebFluxConfigurer {

  @Bean
  RouterFunction<ServerResponse> routerFunction(NoteHandler noteHandler) {
    return route(GET("/api/notes"), noteHandler::all)
        .andRoute(GET("/api/notes/{id}"), noteHandler::getById)
        .andRoute(PUT("/api/notes/{id}"), noteHandler::updateById)
        .andRoute(DELETE("/api/notes/{id}"), noteHandler::deleteById)
        .andRoute(POST("/api/notes"), noteHandler::create);
  }
}
Handler methods
These are pretty standard CRUD endpoints. It’s convenient to see all our routes defined together at a high level! Our endpoint implementations are implemented in our NoteHandler below:
@Component
class NoteHandler {

  private final NoteRepository noteRepository;

  NoteHandler(NoteRepository noteRepository) {
    this.noteRepository = noteRepository;
  }

  Mono<ServerResponse> getById(ServerRequest r) {
    return defaultReadResponse(this.noteRepository.findById(id(r)));
  }

  Mono<ServerResponse> all(ServerRequest r) {
    return defaultReadResponse(this.noteRepository.findAll());
  }

  Mono<ServerResponse> deleteById(ServerRequest r) {
    Mono<Note> noteMono = this.noteRepository.findById(id(r))
        .flatMap(n -> this.noteRepository.deleteById(id(r)).thenReturn(n));
    return defaultReadResponse(noteMono);
  }

  Mono<ServerResponse> updateById(ServerRequest r) {
    Flux<Note> noteFlux = r
        .bodyToFlux(Note.class)
        .flatMap(toWrite -> this.noteRepository.save(toWrite));
    return defaultWriteResponse(noteFlux);
  }

  Mono<ServerResponse> create(ServerRequest r) {
    Flux<Note> flux = r
        .bodyToFlux(Note.class)
        .flatMap(toWrite -> this.noteRepository.save(toWrite));
    return defaultWriteResponse(flux);
  }

  private static Mono<ServerResponse> defaultWriteResponse(Publisher<Note> notes) {
    return Mono
      .from(notes)
      .flatMap(n -> ServerResponse
          .created(URI.create("/notes/" + n.getId()))
          .contentType(MediaType.APPLICATION_JSON)
          .build()
      );
  }

  private static Mono<ServerResponse> defaultReadResponse(Publisher<Note> notes) {
    return ServerResponse
        .ok()
        .contentType(MediaType.APPLICATION_JSON)
        .body(notes, Note.class);
  }

  private static Long id(ServerRequest r) {
    return Long.valueOf(r.pathVariable("id"));
  }
}
Although I don’t recommend delegating directly to your repository in your handler methods (use a service layer!), you can see it’s pretty easy to do so. Since I’ve borrowed the shell of this handler from Matt Raible’s post (with a few modifications), I defer to his explanations for the purpose of brevity.
Add the repository
Next, let’s look at our repository layer. Spring Data R2DBC is not an ORM–as explained on Spring Data R2DBC’s github page…
Spring Data R2DBC aims at being conceptually easy. In order to achieve this it does NOT offer caching, lazy loading, write behind or many other features of ORM frameworks. This makes Spring Data R2DBC a simple, limited, opinionated object mapper.
Despite Spring Data R2DBC not being an ORM (which is arguably a good thing), there’s still a lot of power like you’re used to with Spring Data JPA repositories. We can still inherit basic CRUD methods without forfeiting the ability to add our own custom ones.
Notice: QueryDsl does not yet support R2DBC (so add your votes!)
interface NoteRepository extends ReactiveCrudRepository<Note, Long> {

  @Query("SELECT * FROM note WHERE text = :text")
  Flux<Note> findByText(String text);
}
Add the schema
Now for our schema. In my opinion, Flyway or liquibase are great choices for database revision management. However, for this demo, we’ll simply include src/main/resources/schema.sql and Spring Boot will automatically apply it on its embedded h2 server. We don’t have Hibernate’s DDL tricks at our disposal here but you might be able to leverage Liquibase (see Kenny Bastani’s delete tweet). Here’s our uber-simple schema…
CREATE TABLE note (id SERIAL PRIMARY KEY, text VARCHAR(255), confidential BIT);Configure application.yml
In our src/main/resources/application.yml, we’ve got minimal configuration that sets our port and the issuer-uri for our locally running identity provider, keycloak.
server:
  port: 8081
spring:
  security:
    oauth2:
      resourceserver:
        jwt:
          issuer-uri: http://localhost:9080/auth/realms/jhipster
Use docker-compose to start Keycloak
Why the is our issuer using the realm jhipster? I was too lazy to configure keycloak for something else and took the default realm-config and users from what jhipster provides :) It includes
- two realms (
masterandjhipster) masterrealm includes 1 user:admin/adminjhipsterrealm includes 2 users:admin/admin(different frommaster’s) anduser/user- default identity role for
jhipsteradmin:ROLE_ADMIN - default identity role for
jhipsteruser:ROLE_USER - default client id and secret of
web_app/web_appconfigured for authorization_code flow
and, it’s really easy to start up on port 9080 with docker-compose! We’ve included a copy of it in the root directory of our github repo
docker-compose upGo to http://localhost:9080/auth/admin and log in with admin/admin.
Playing around with our note service
Start the Spring Boot application
That’s it! Fire up the app from the note directory
./mvnw spring-boot:runOnce your app is up and running, head over to your favourite http tool to start interacting with our note service. We’ll use Postman.
Create a note using Postman
Create a note using a POST to http://localhost:8081/api/notes with the a JSON body as follows:
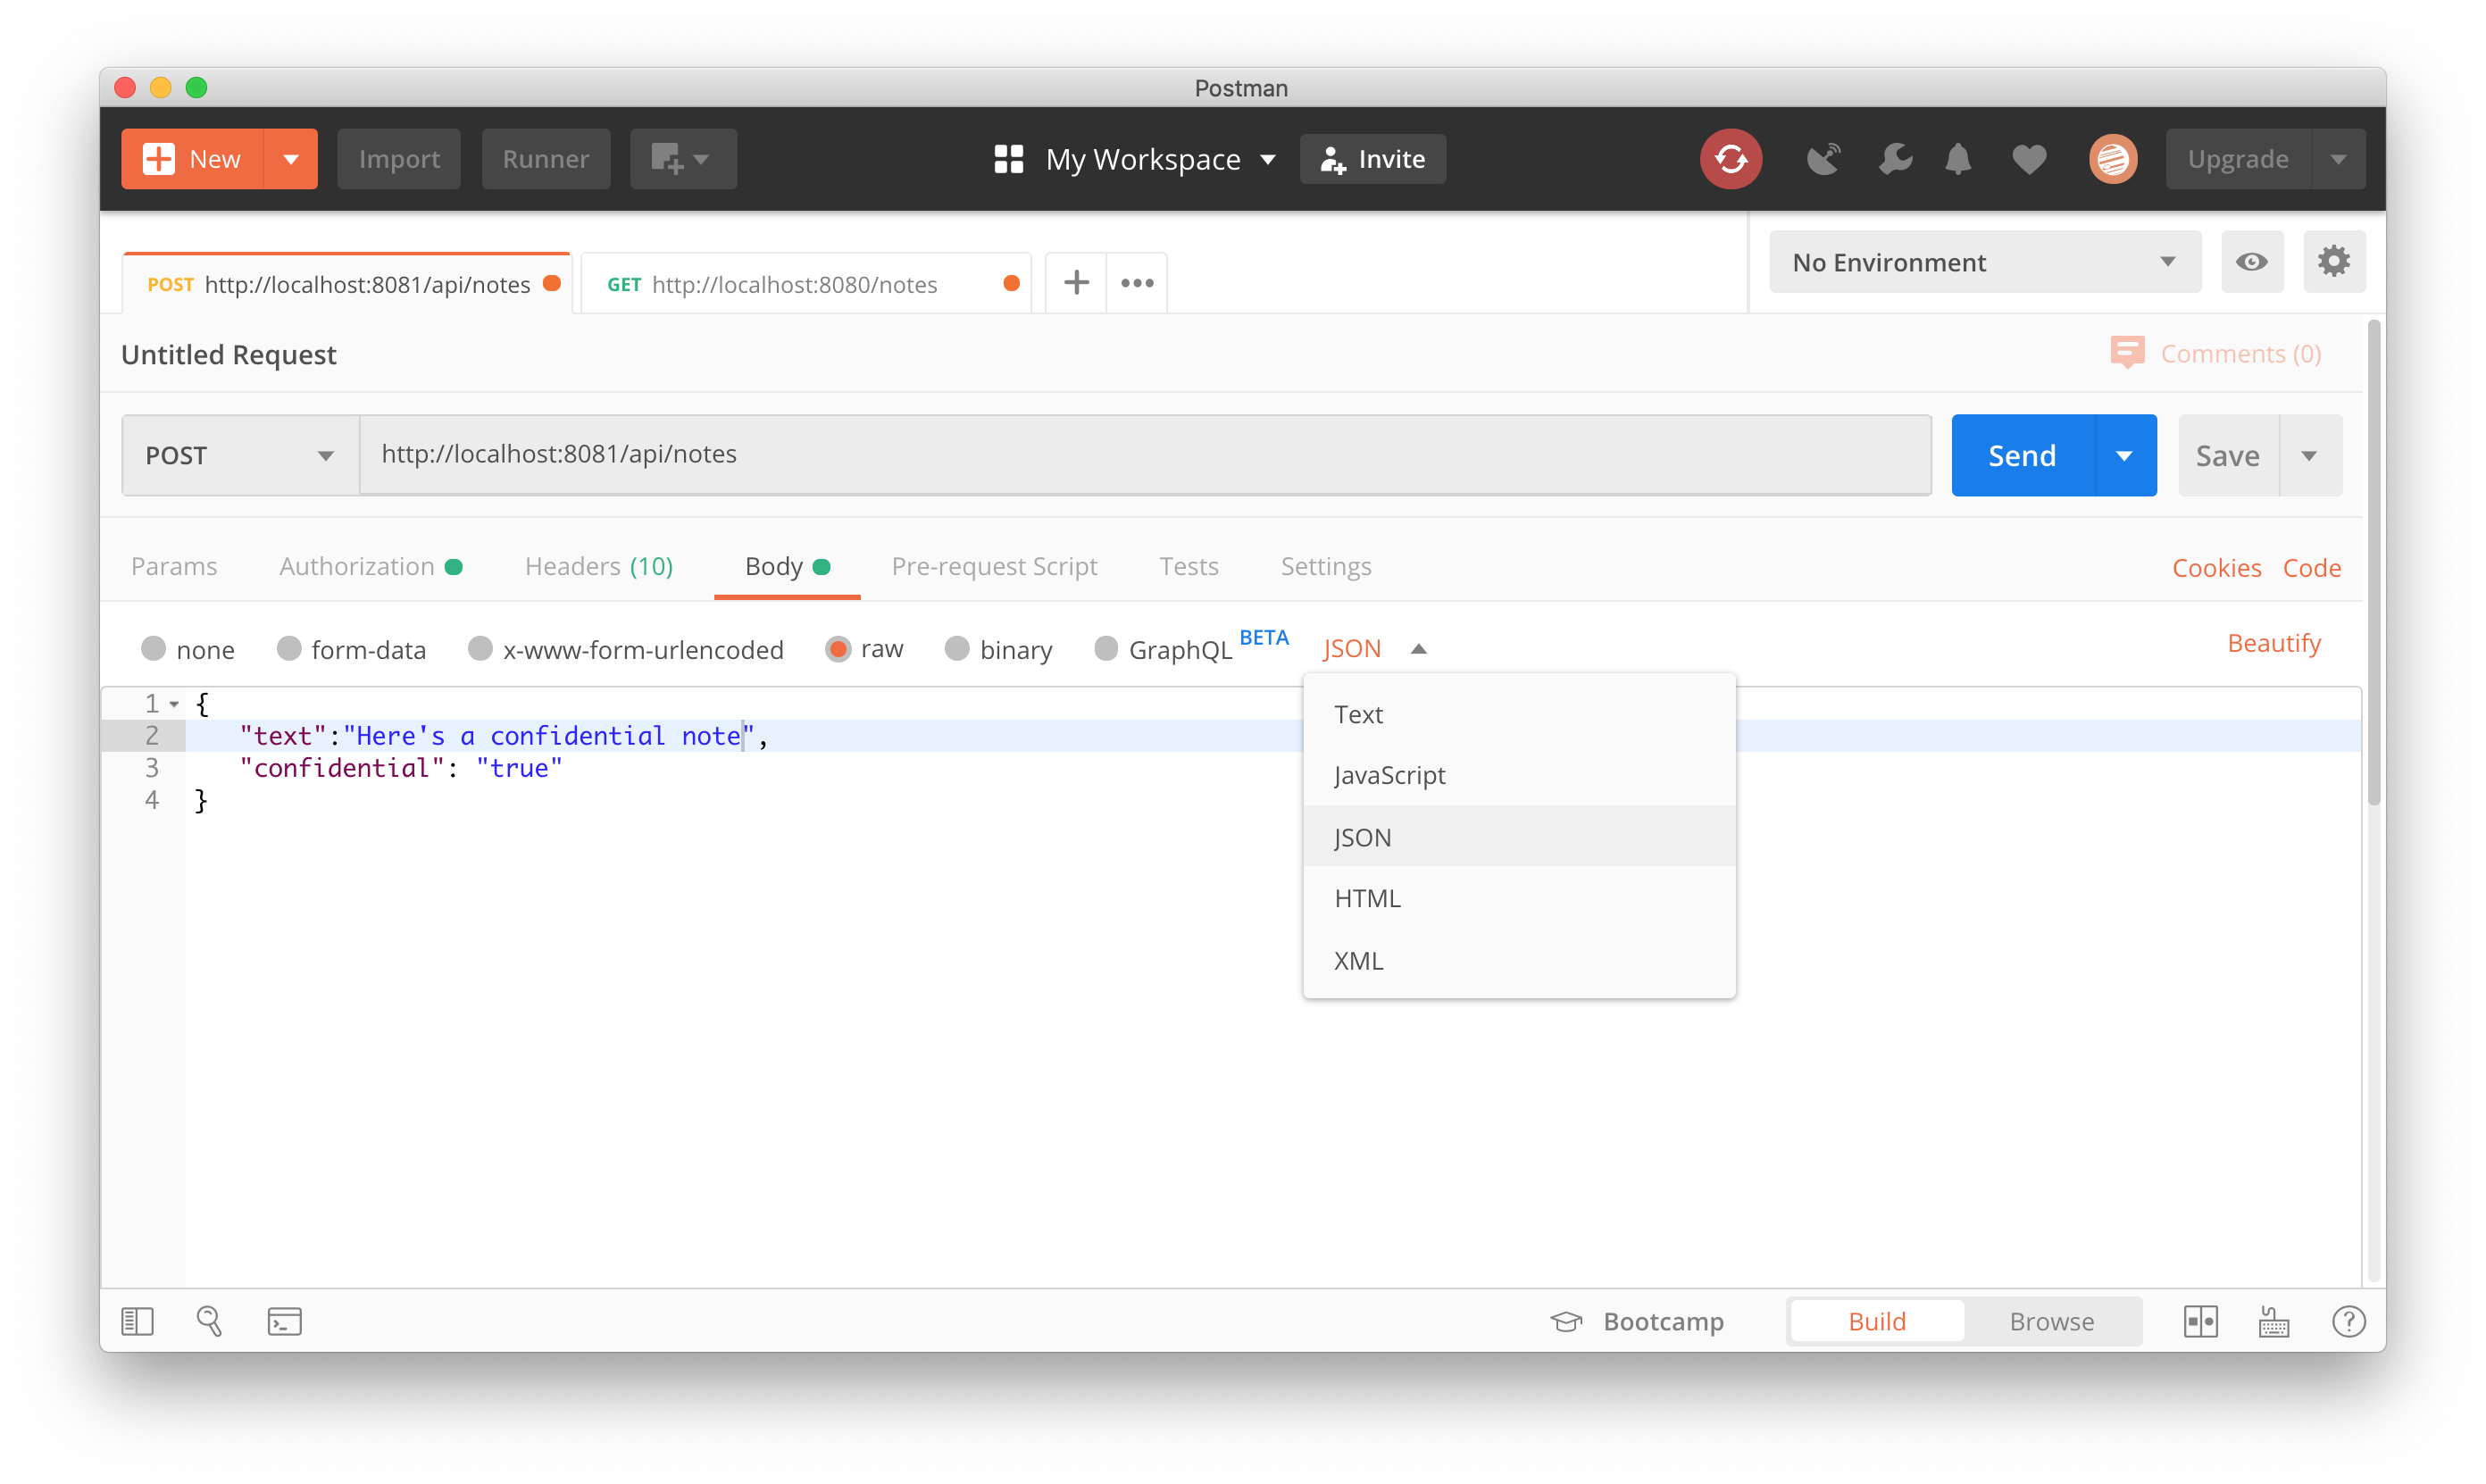
{
   "text":"Here's a confidential note",
   "confidential": "true"
}
Go to your Authorization section, click the “Get New Access Token” button, and fill in the OAuth 2.0 configuration for your identity provider. Our configuration is as follows:
Tip: If you you need to look up the endpoints, use the discovery endpoint as your guide
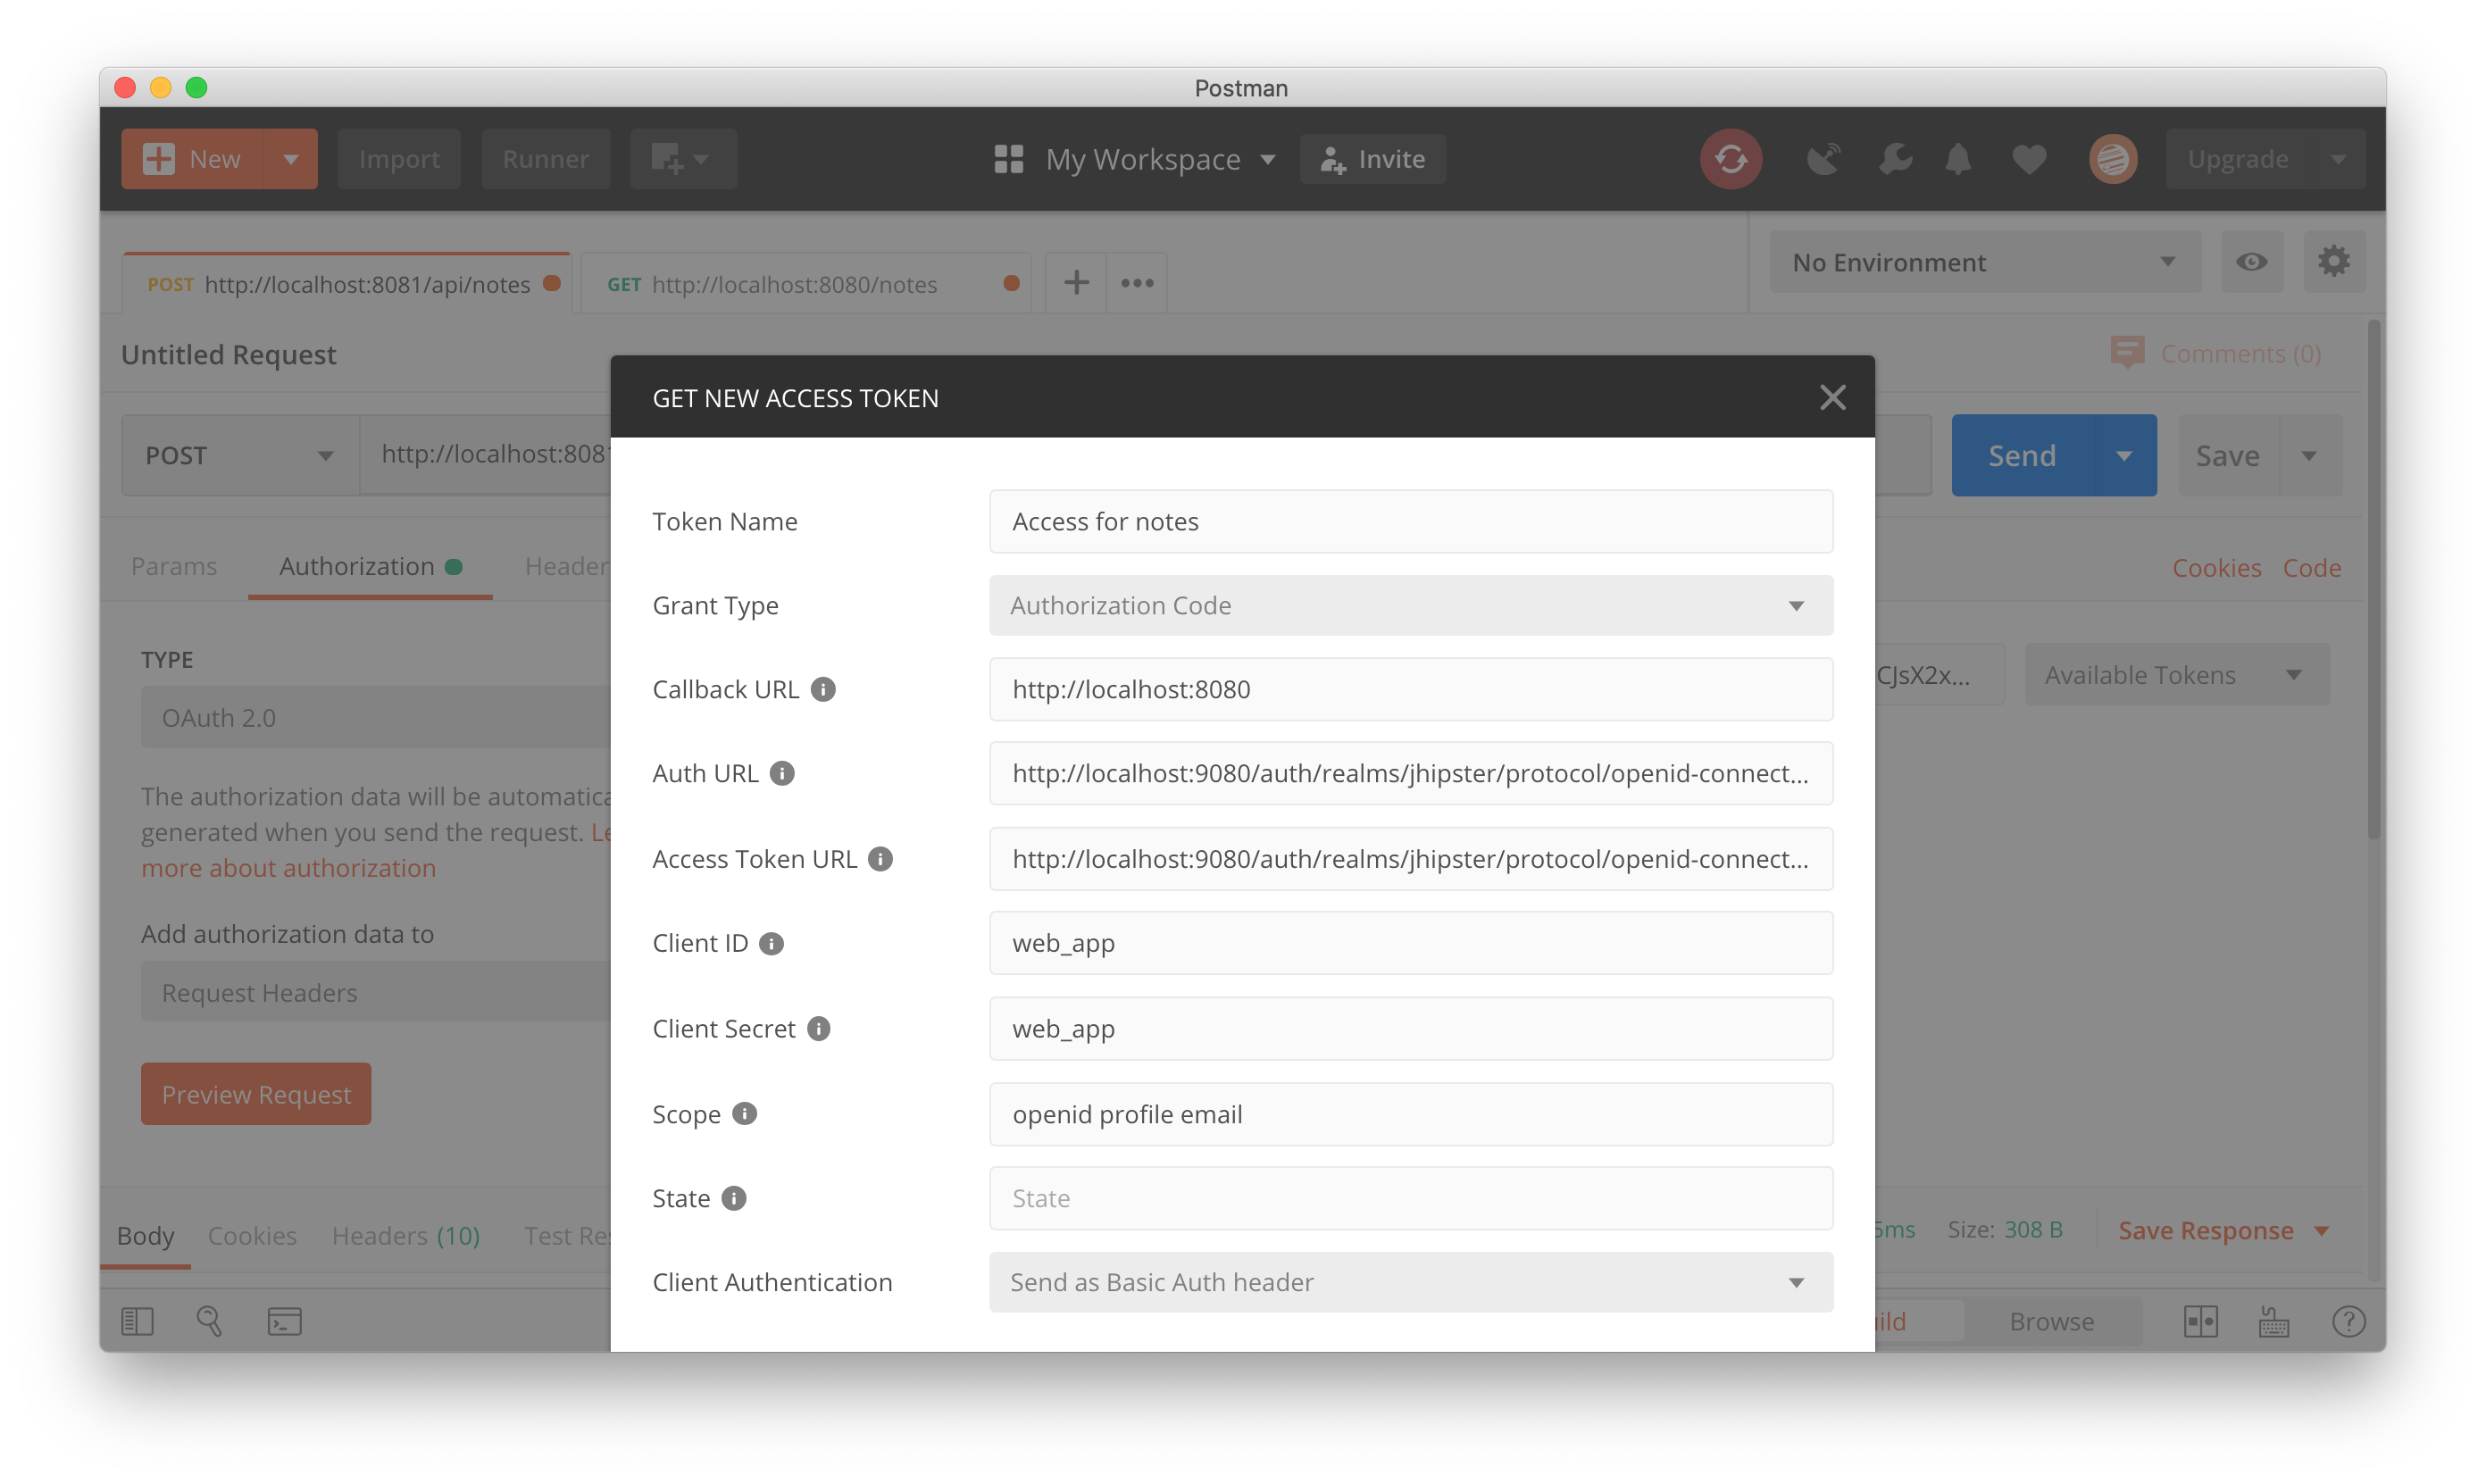
Request the token, use the token, and then “Send” your request. You should see a 201 response for your newly created note.
Get the note back using Postman
Similar to creating a note, we can change our HTTP Method to GET at the same endpoint, http://localhost:8081/api/notes, get an access token as before, and “Send” the request. We should see a 200 response containing the note we created earlier that looks something like this:
[
    {
        "id": 1,
        "text": "Here's a confidential note",
        "confidential": true
    }
]
Conclusion
So now, we’ve got a fully reactive OAuth 2.0 Resource Server built with Spring Boot Webflux app and R2DBC.
Next time (in Part 2), we’ll create a gateway application with React (Create React App) and Spring Cloud Gateway (with Webflux) that will
- Serve up our React CRUD application with a great development experience
- Manage all the OAuth 2.0 and OpenID Connect token flows automatically and safely with Spring Security 5.2.x and relay the access tokens to our note service
Let me know what you think in the comments section.
Thanks for reading!
Please follow me on twitter or subscribe to be updated as each part of this series comes out.
If you’d like help with any of these things, find out how what I do and how you can hire me at Simple Step Solutions